
Objects, models and items
The Objects menu item gathers everything that has a model and has a menu of its own: the side bar leads eight groups in three blocks (catalogue, masks, soon), and every group unfolds its content under its row. Every available group opens one surface, Kits is locked for now and opens nothing.
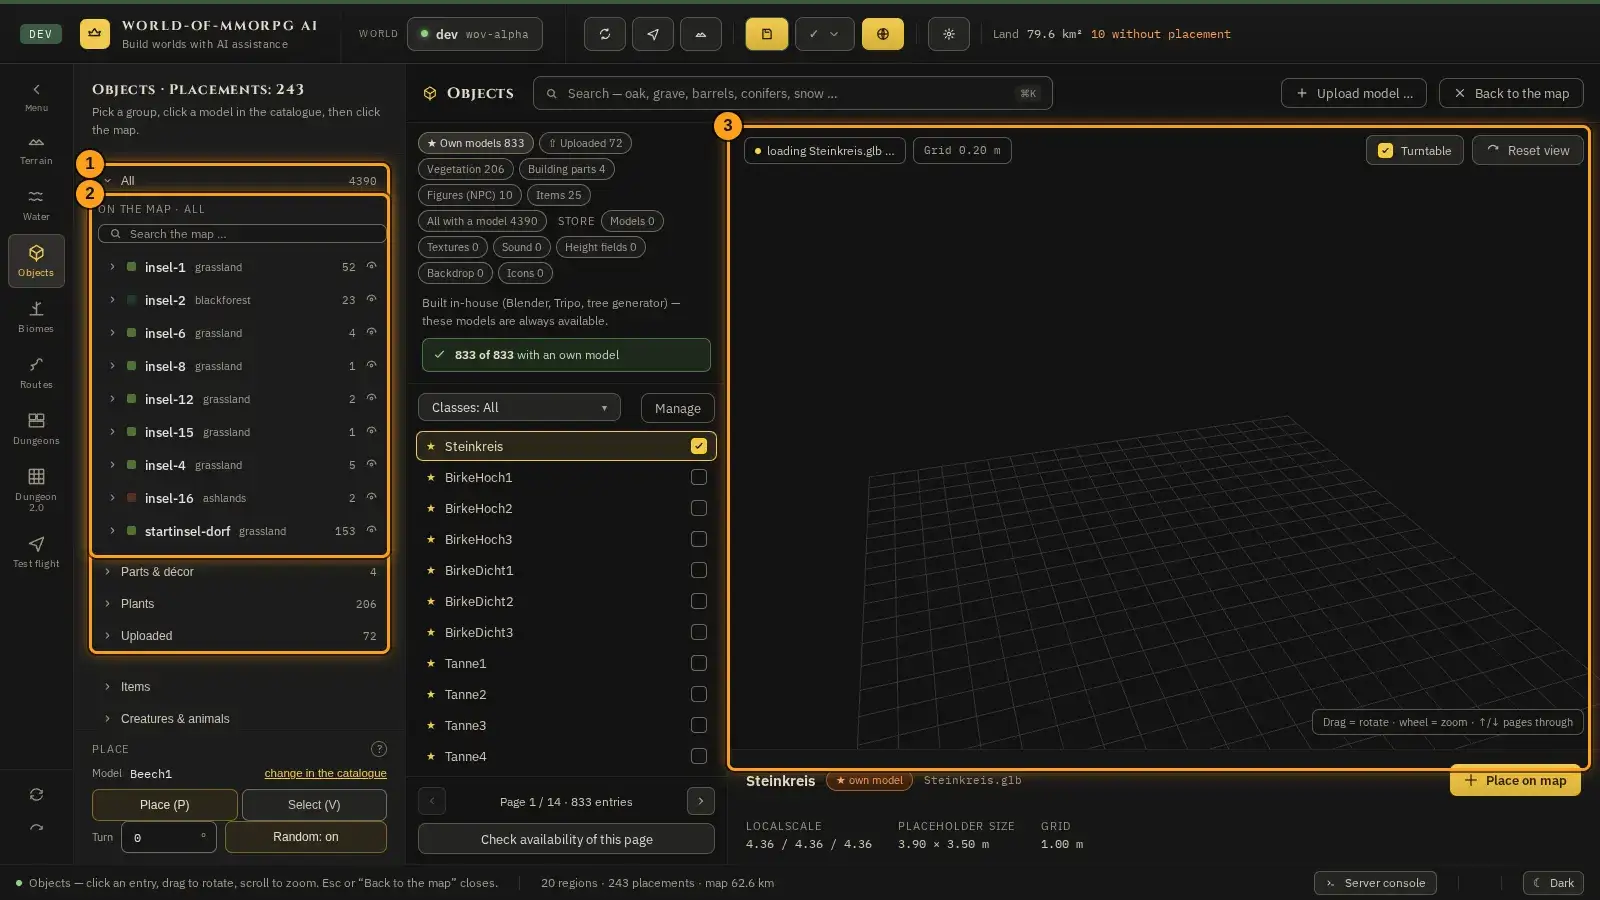
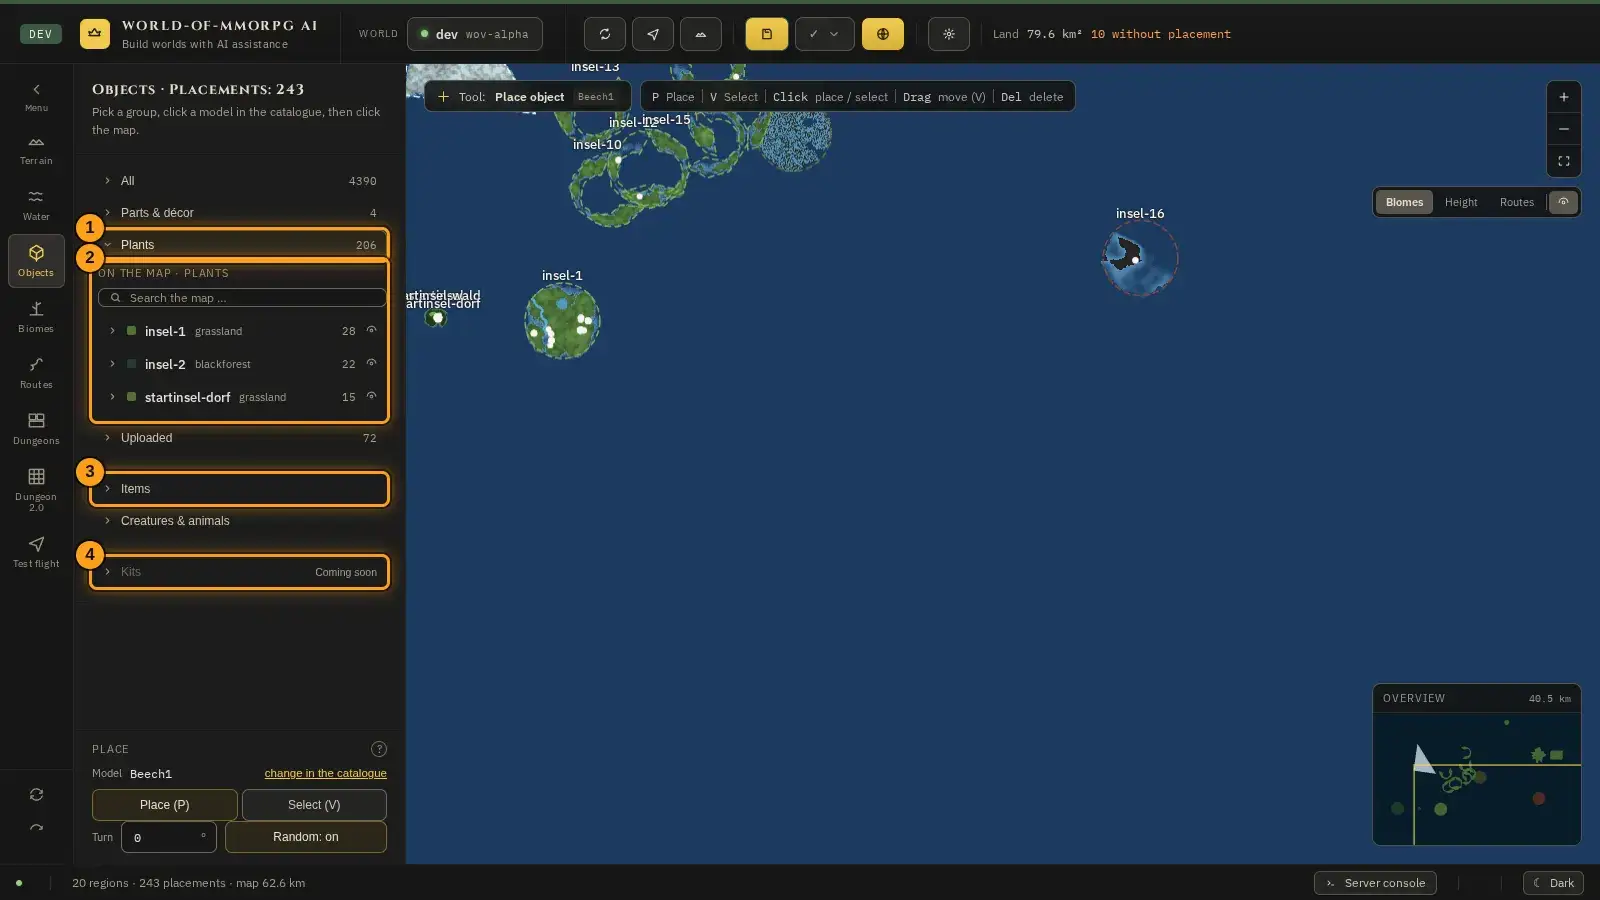
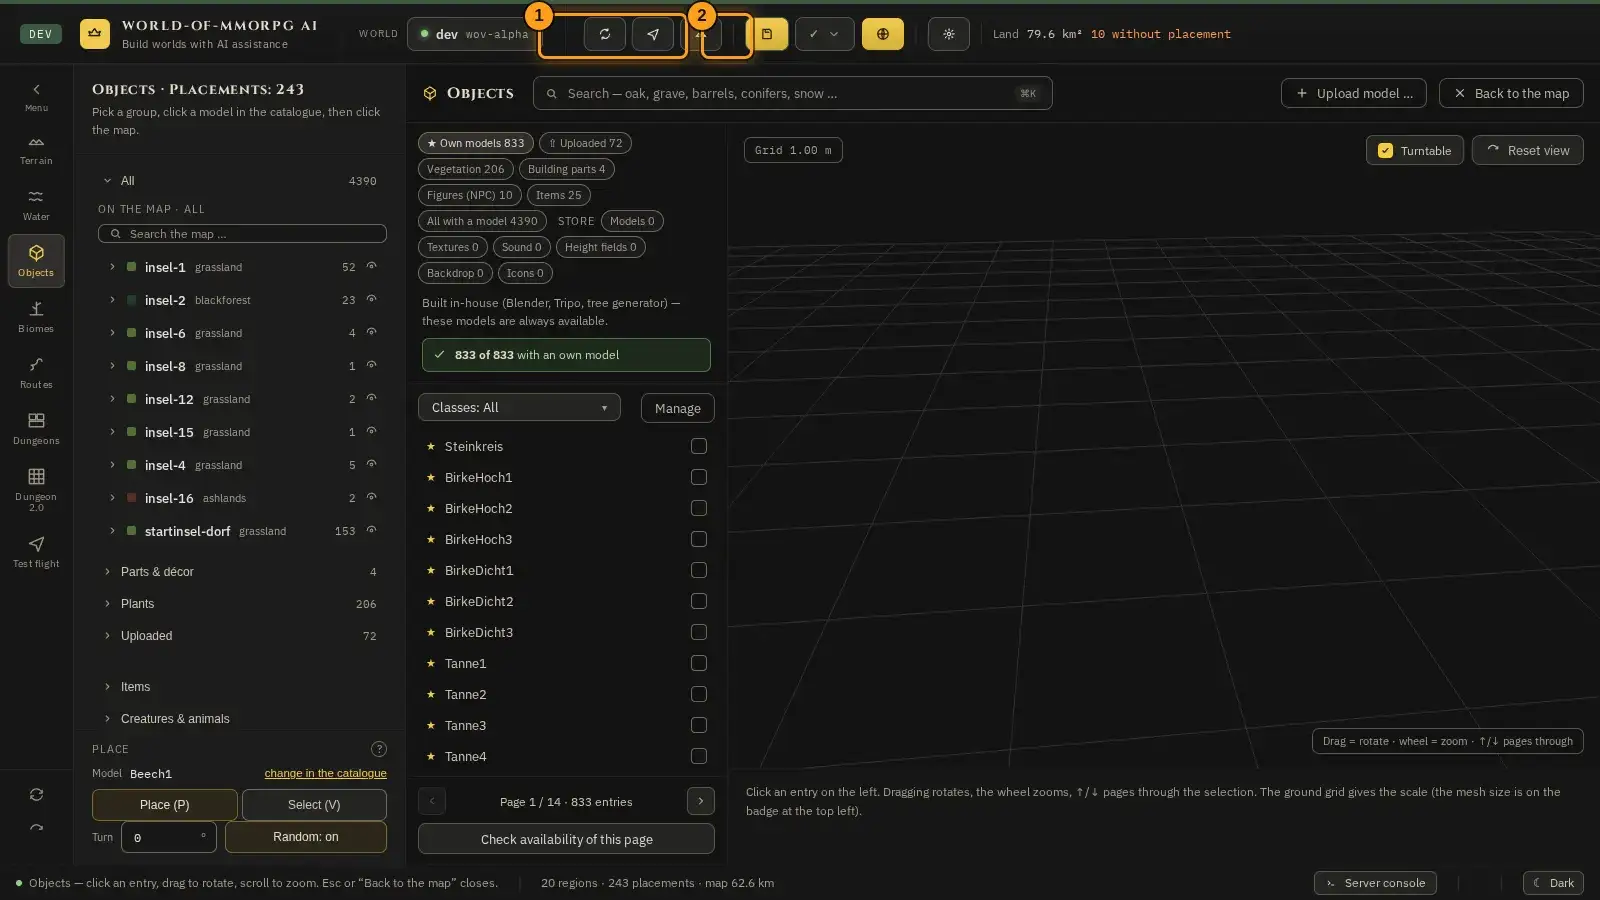
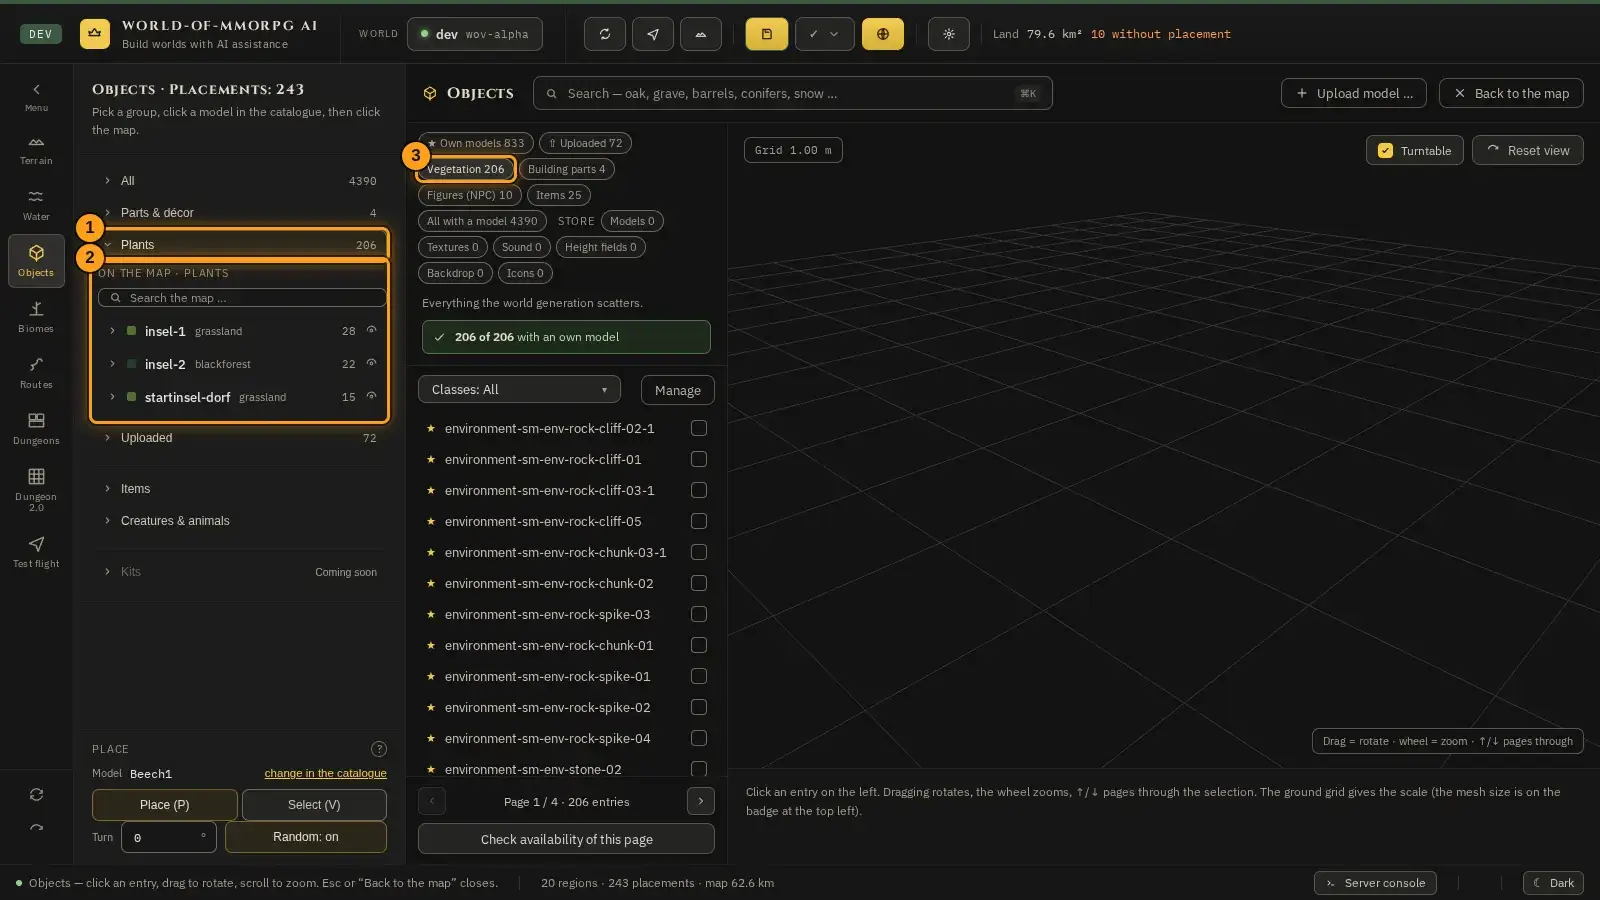
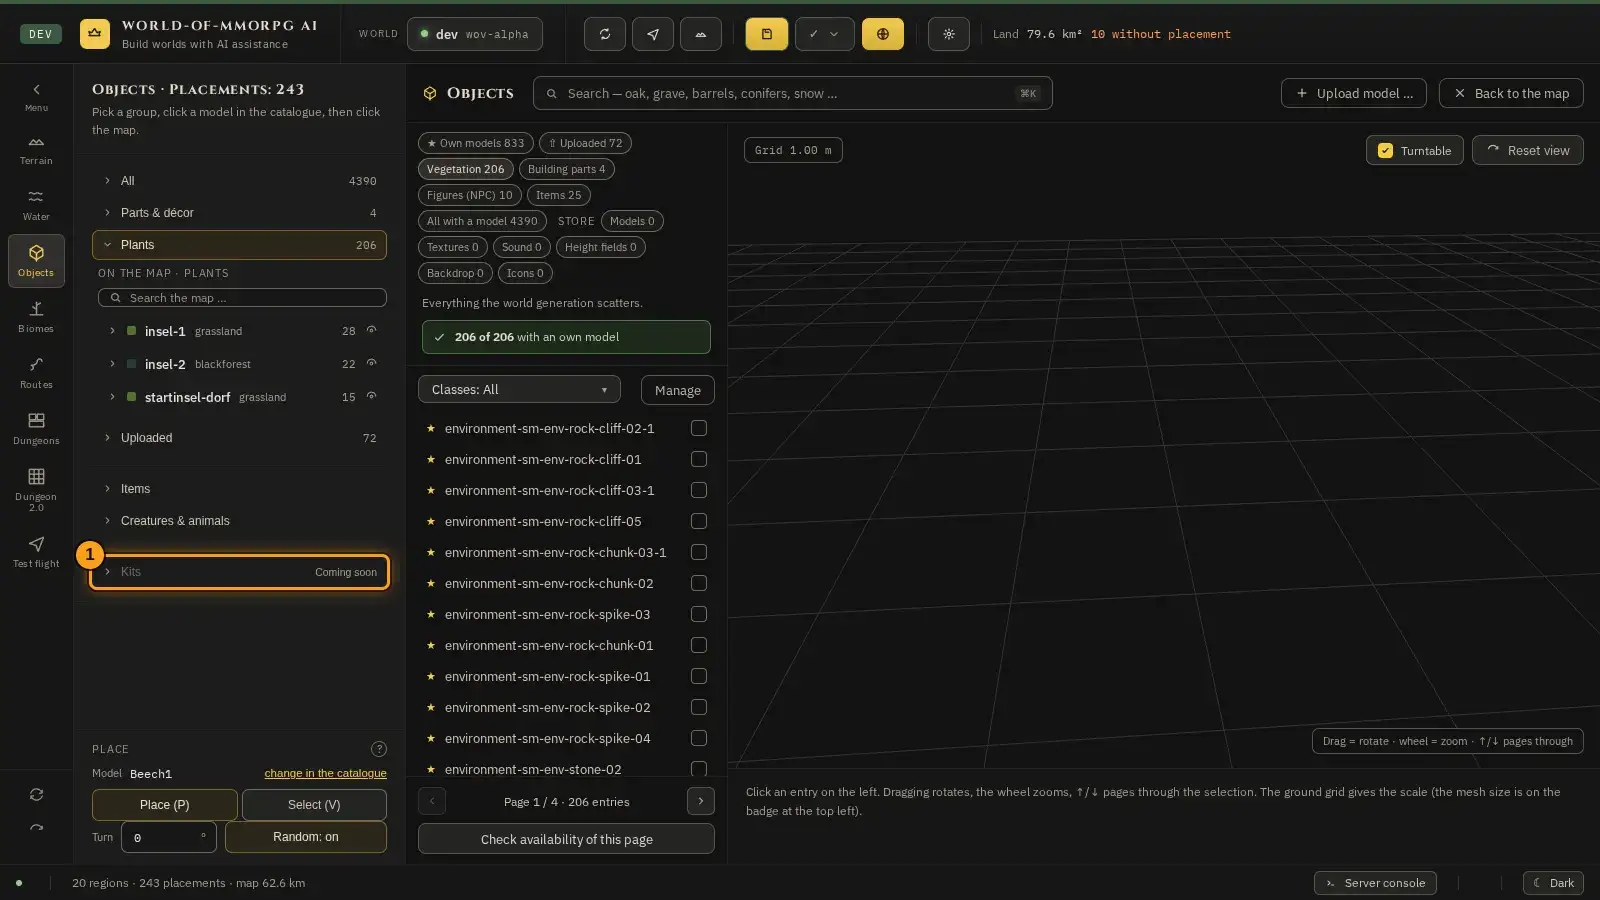
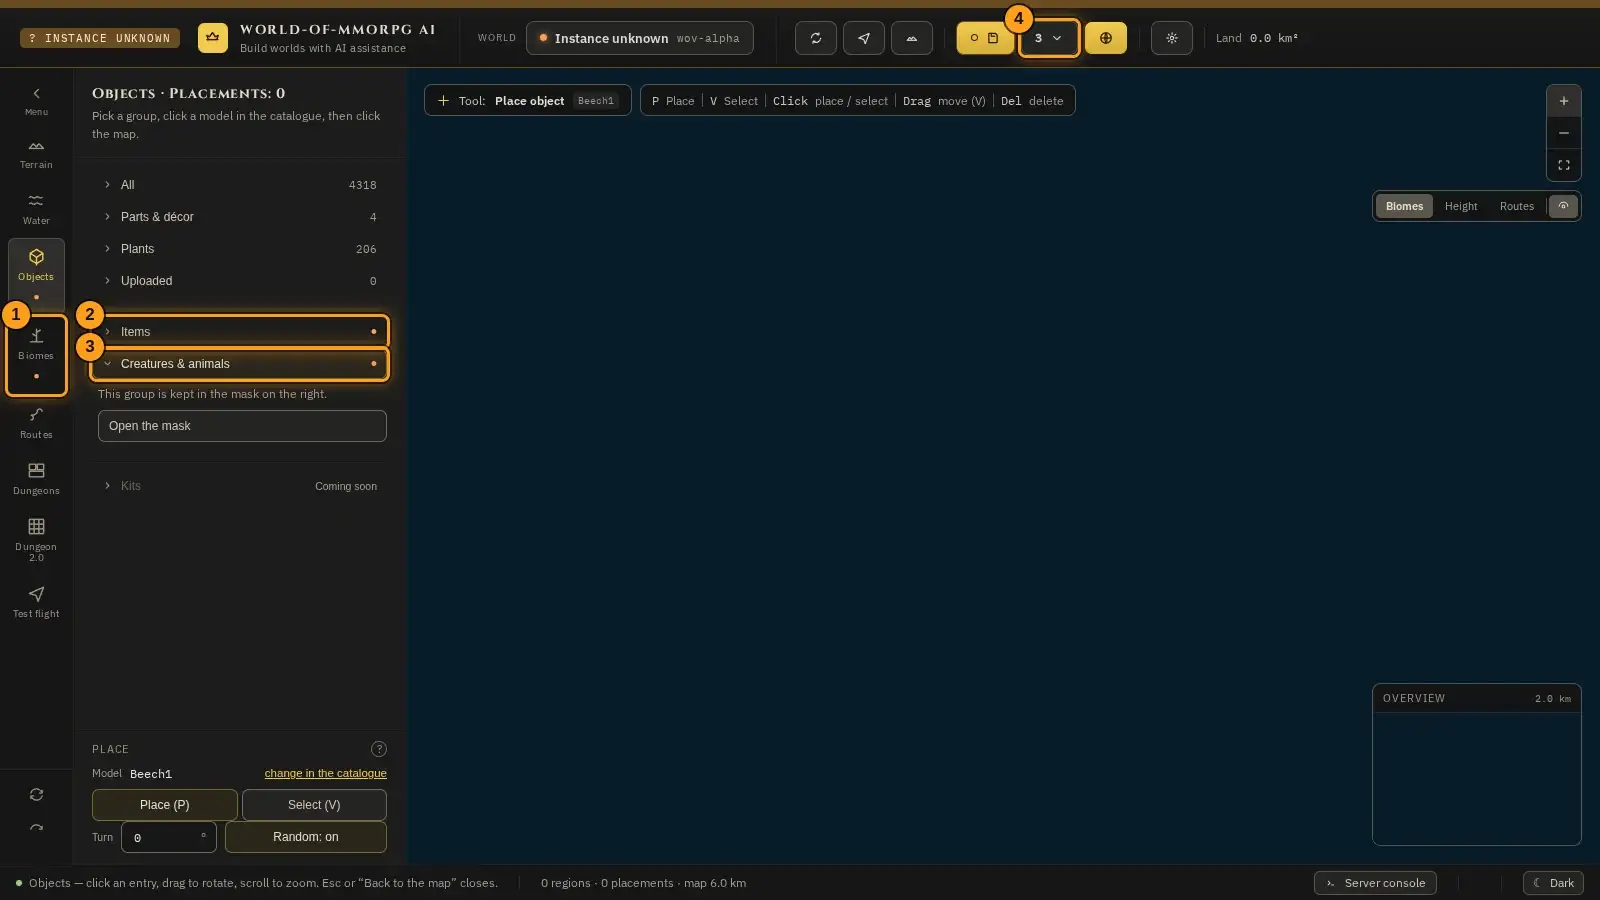
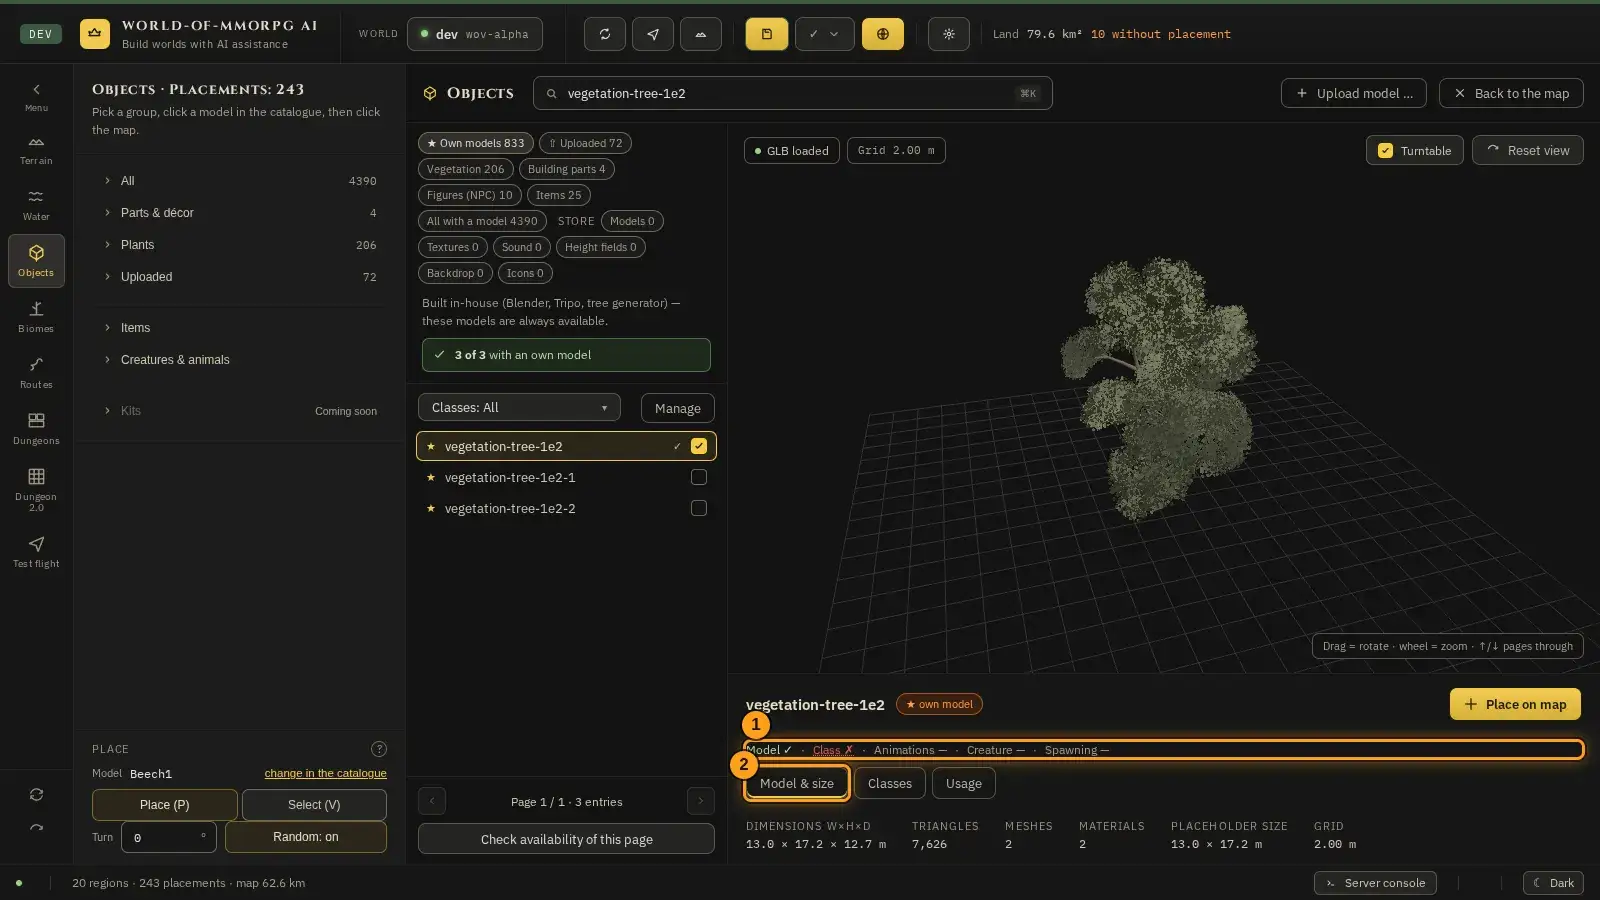
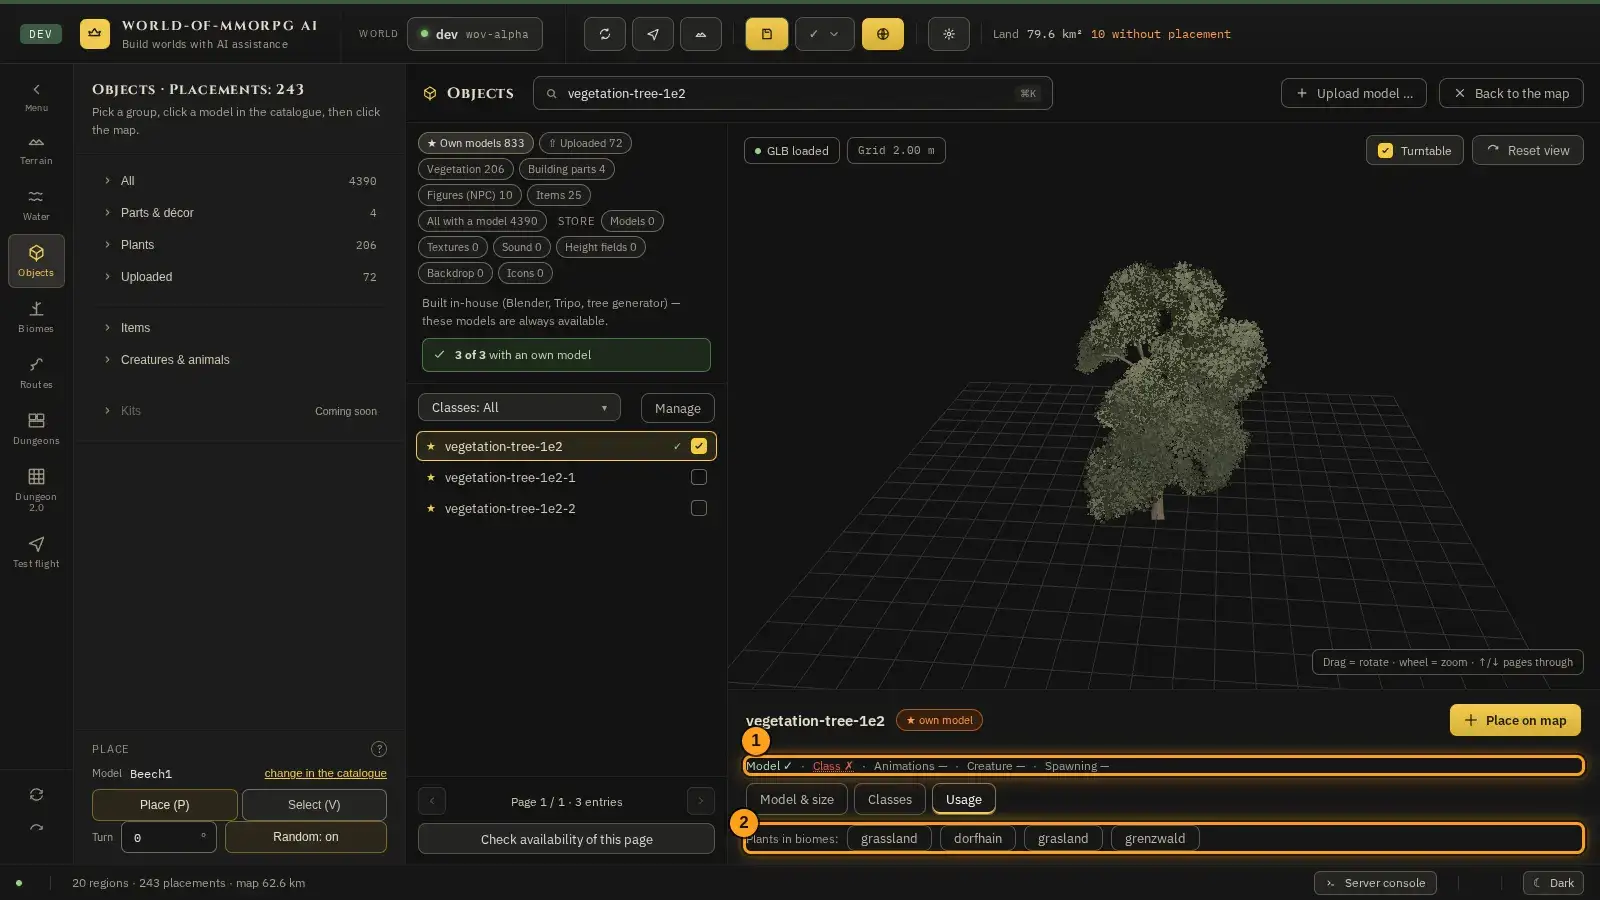
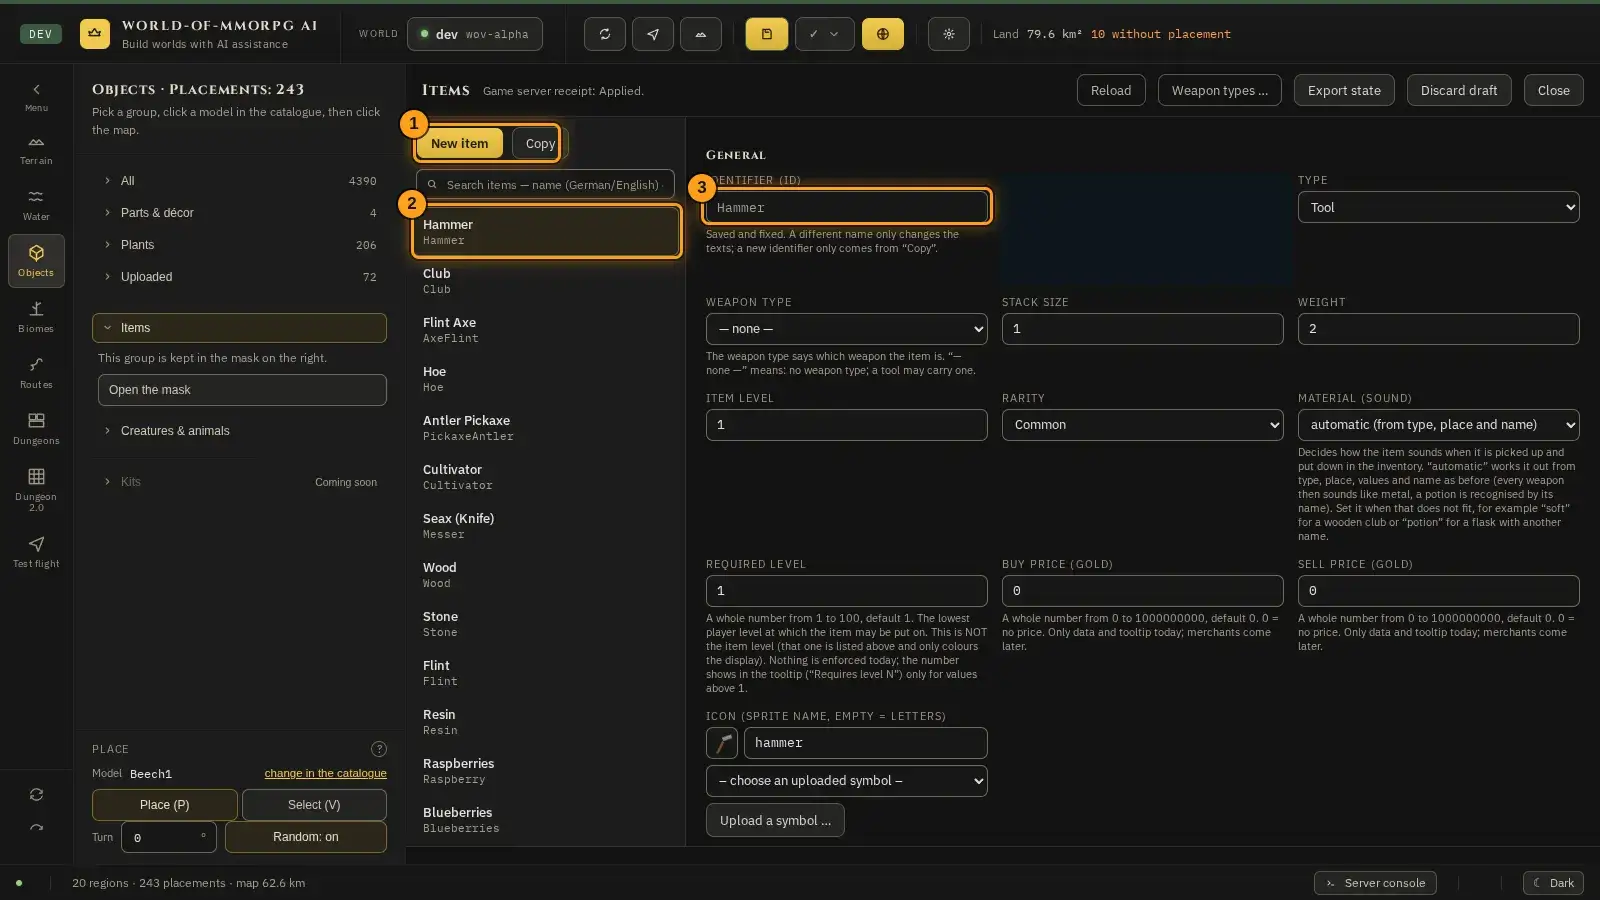
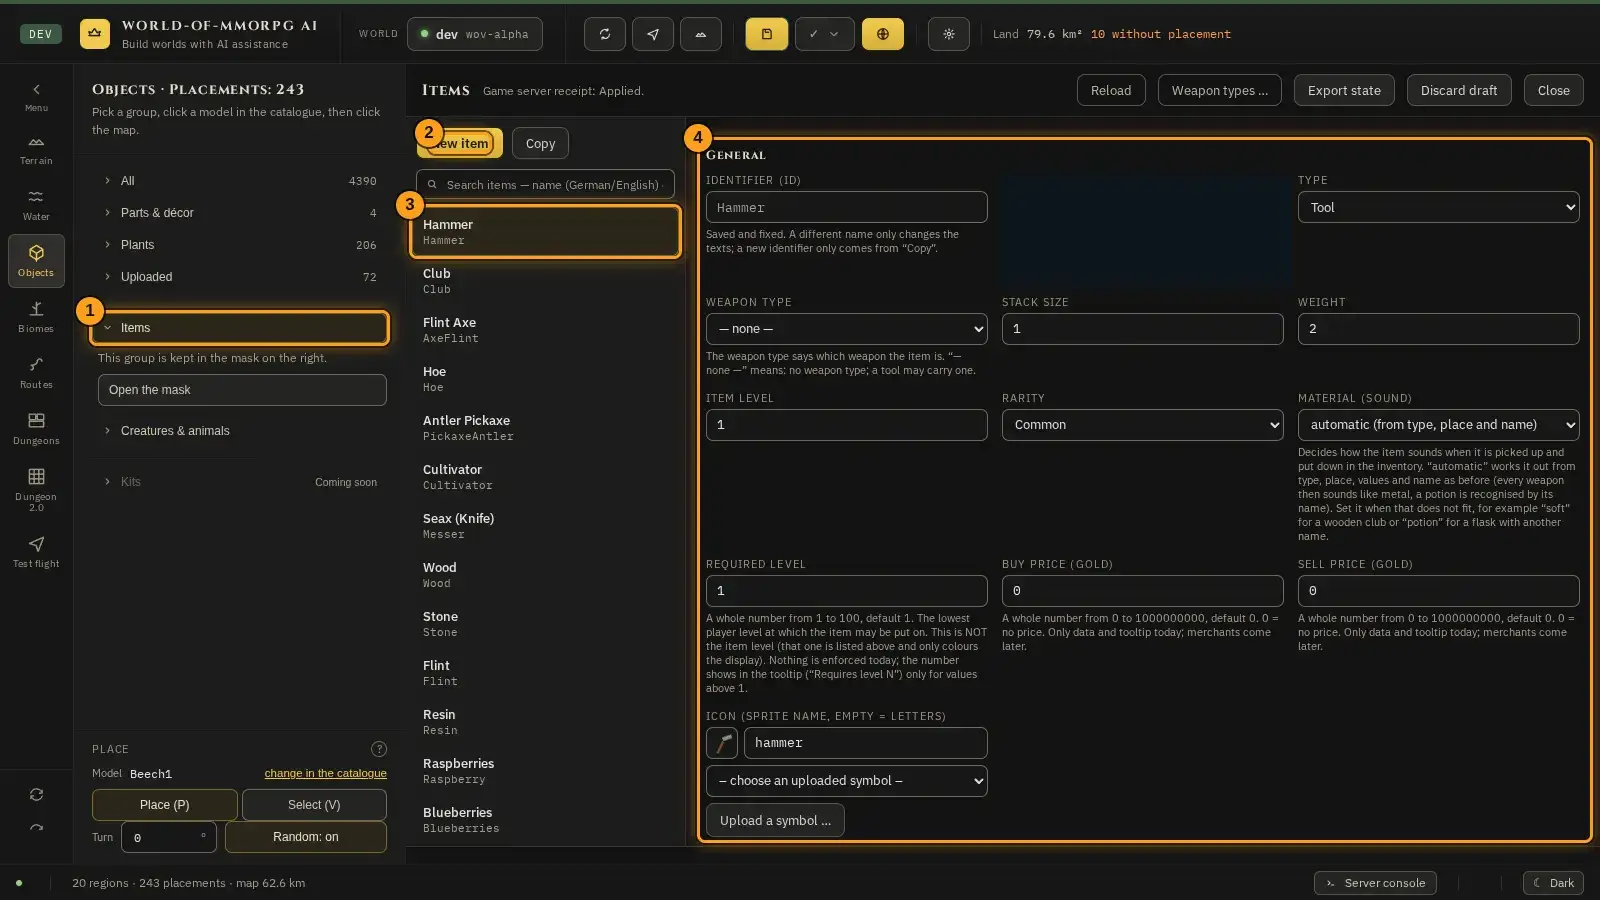
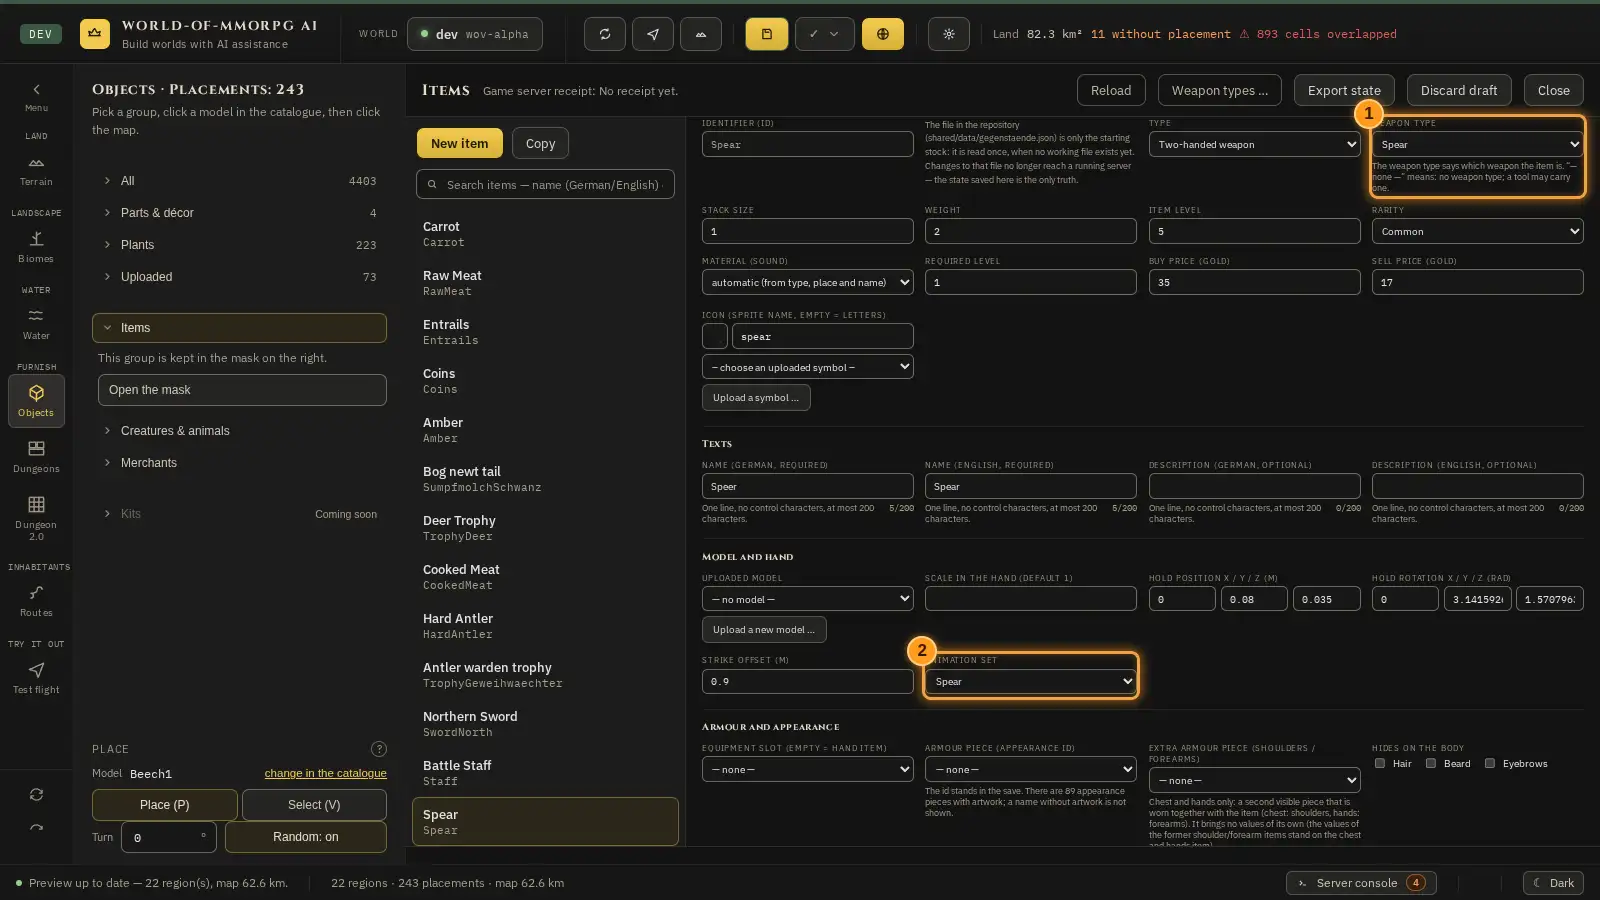
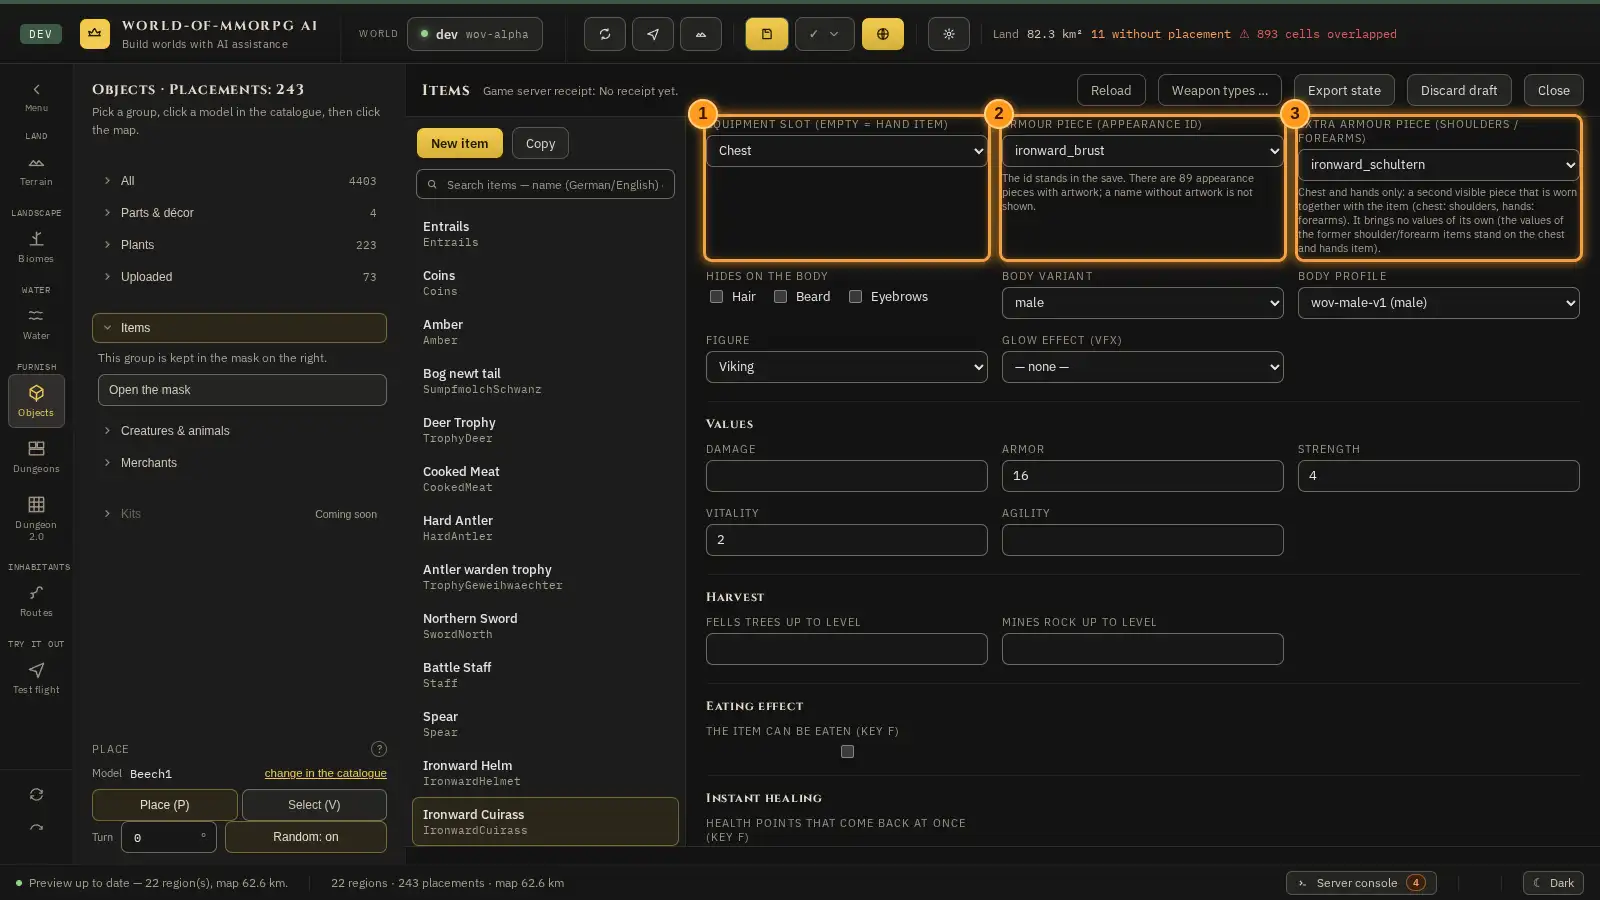
The pictures show the editor with sample data. The orange frames and numbers refer to the steps in the text.
Using the catalogue
What for?
The catalogue holds everything you can put into the world: trees, houses, rocks, fences and much more. You see every model in 3D before you place it.
How it works
- Choose the “Objects” tile on the left. The side bar shows eight groups in three blocks: the catalogue groups All, Parts & décor, Plants and Uploaded (your own uploads), then the masks Items, Creatures & animals and Merchants, last Kits. At the bottom the row “Place” stays fixed with everything you need for placing.
- Click a group: it unfolds its content under the row, and the group that was open folds in — at most one is open at a time. The four catalogue groups open the catalogue with their filter set (Uploaded opens the catalogue tab “Uploaded”) and show the list “On the map” below (only the objects of this group, bundled per island, with a search field; for Uploaded only placements of uploaded models). Items and Creatures & animals open their own mask; below them stands a note with the button “Open the mask”. With the keyboard, the arrow keys walk through the rows and Enter or Space unfold and fold. There is at most one surface over the map at a time. A second click on the open group only folds it in; the surface stays as it is. Exception for Items and Creatures & animals: if their mask is closed while the group stayed unfolded — with the mask’s own close button, with Esc, or because another surface displaced it (such as the full-screen catalogue or a change of mode) — a click on the group that is still unfolded opens the mask again; only the next click folds the group in.
- The number at the right of a name is the number of models in the catalogue — not the placements on the map; that number is in the head of the side bar. The catalogue is built hidden in the background shortly after the editor starts, so the numbers are already there when you first open Objects; in the very first seconds a number can still be missing — then no number is shown, never an invented zero. The groups Items and Creatures & animals have no group counter at all yet and therefore stand without a number.
- Kits is still locked: the row is visible and says “Coming soon”. The bars in the header row are pure actions: Rebuild preview, Test flight, Island picker, Save to the world — the buttons Items and Creatures are gone from there.
- In the catalogue you pick the object and place it on the map. The header has a single line: the title, the search field (Ctrl/⌘+K jumps into it), the button “Upload model …” (see “Upload your own 3D model”) and “Back to the map”. There is no category dropdown any more: the category is set by the group you click in the side bar. On the left above the list, the chips show every stock with its count and mark the chosen category; all chips are shown in full, none is cut off, and a click switches the stock, for example to “Figures (NPC)” or to one of the six store kinds that have no group of their own in the side bar. Below them a sentence says what the category holds (without file paths), then the class filter with the button “Manage” and the list. On the stage at the right, “Turntable” and “Reset view” sit in the top right corner; the chosen model turns there. Under the name the sequence line shows what already exists for this model; more in the chapter “Reading the object card”.
- Use “Back to the map” or the Esc key to close the catalogue again.
- Biomes, creatures, animal animations and items keep unsaved input as a draft when closed, on Esc and when switching masks, without asking. Reopening shows the draft. A dot on the menu entry marks unsaved input; the Objects tile collects the item and creature dots. “Save all” also writes drafts from closed masks. Only “Discard” or “Discard draft” explicitly removes input. Drafts belong to this editor session: closing a mask is not saving, and you must save before leaving or reloading the browser page.
- The source “All with a model” shows the full registry as far as its entries have a model. The number in the note below it (“The full registry, … entries — most of the model files are missing on this server.”) comes from the live registry and grows at once after an upload; it counts only the entries that can be shown with a model, not the whole registry.
Tip: The map leads into the catalogue too: the property card of an object has the button “Place on map”. The status line at the bottom and the messages at the model — “GLB loaded”, “Sound is missing”, “Image is missing”, “Timeout” — are readable in both languages. Under “★ Own models” you also find the boss altar “BossAltar”: with five pieces of raw meat in the bag, one click (E) on it summons the Troll King, each world can hold one living Troll King; as soon as he has been defeated anywhere, the altar stays silent on the whole server. The decoration statues “WikingerStatue” summon nothing. Where are the drawing tools? They are not in Objects any more: island shape, polygon, river, lake, the form and size fields, the check report, the world settings and “Add region” are under Terrain and Water.
Reading the object card
What for?
A model lives in several documents: file, class, animation profile, creature, item and biome. The object card in the catalogue shows at a glance what already exists for this model and what is still missing.
How it works
- Pick a model in the catalogue. Under the header line you see the sequence line with five steps (1): Model, Class, Animations, Creature and Spawning. Each step that shows something can be clicked and takes you to where you look at it or do it.
- A tick (✓) means done. A half circle (◐) means present but incomplete. A cross (✗) means still missing. A dash (—) means the step does not apply to this model. Example: a crate has no animations, so it says “Animations —”; with “Spawning —” the model has no creature that appears in a biome. A question mark (?) means a source could not be reached; the answer is then incomplete, not wrong.
- The tabs (2) switch the view: “Model & size” shows measures and figures, “Classes” the classes of the model, “Animations” (only for animated models) the clips in the file and whether the animation profile is complete. “Usage” lists where the model is used: items, the creature, the biomes that plant the model and the biomes where the creature appears. A click on an entry opens the matching mask.
- A click on “Class” opens the “Classes” window for this model; that is where you set the class. “Animations” opens the animations of the model. “Creature ✗” creates a new creature with this model in the creature mask (for uploaded models without a creature), “Creature ✓” opens the existing one. “Spawning” opens the animal list of the biome where the creature appears; with ✗ a biome you can add it to.
Tip: If “Creature” has no tick, click “Creature ✗”: the creature mask opens on “New creature” with this model. The line reads from left to right the way you set up an animal.
Placing objects on the map
What for?
This is where you fill your islands with life: trees, stones, houses and whatever your catalogue offers.
How it works
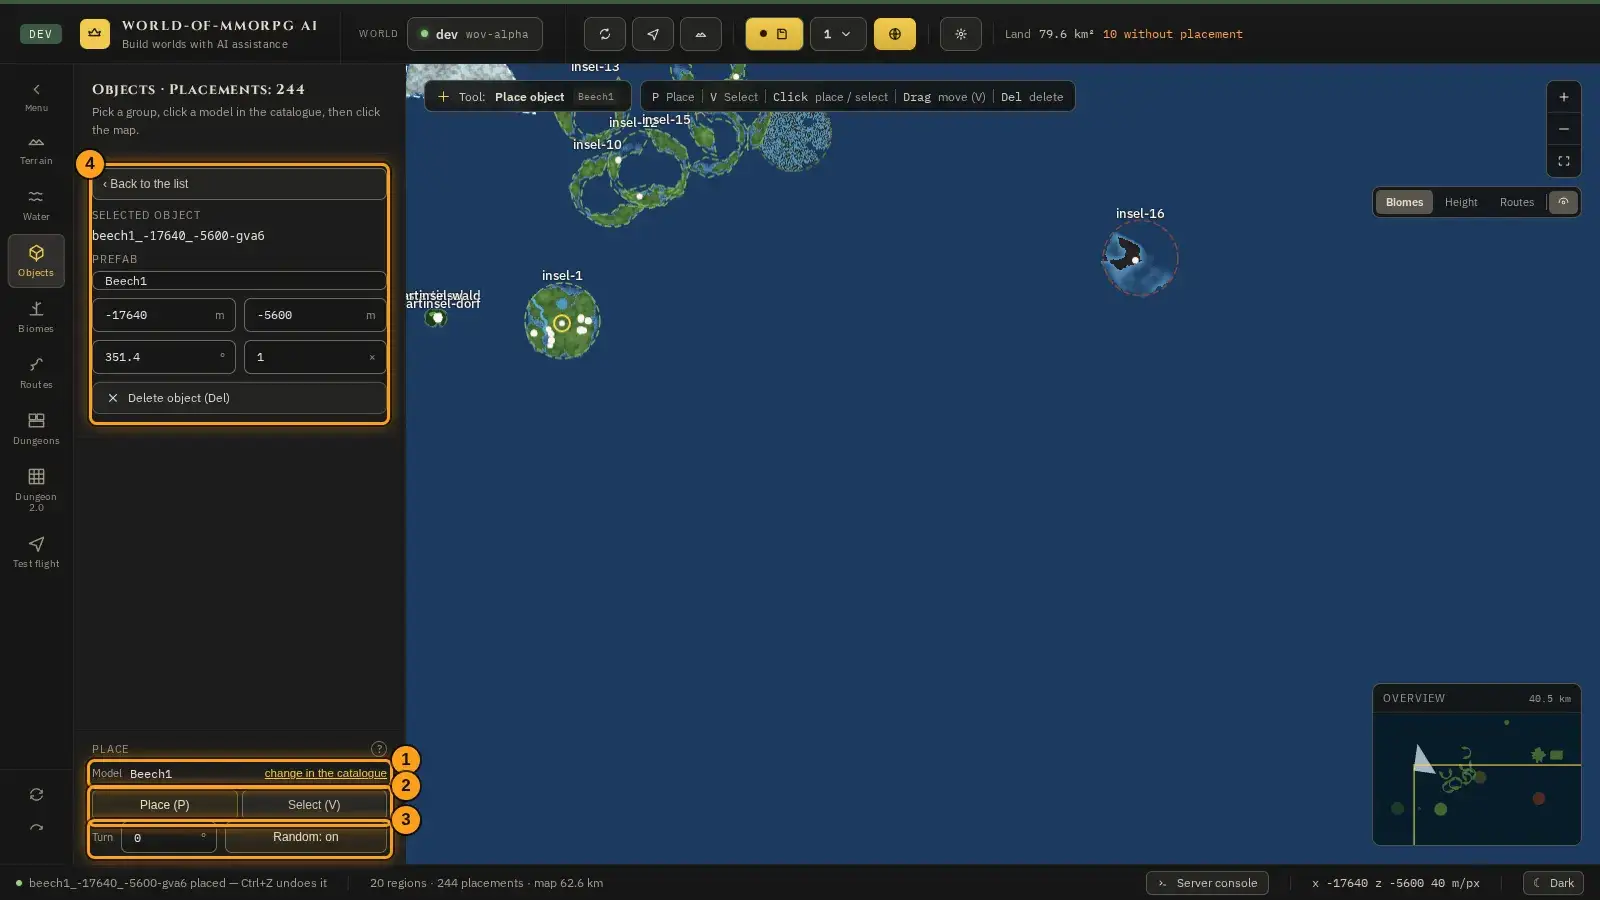
- Pick the “Objects” mode and close the catalogue with “Back to the map”. The placing tool is active; everything you need for placing stands at the bottom of the side bar in the fixed foot “Place”.
- With “Place (P)” (2) every click on the map places the chosen model. With “Select (V)” (2) a click picks the nearest object and dragging moves it. Del or Backspace deletes the selection. As soon as an object is chosen — also the one you have just placed — the selection block (4) takes the place of the list: on top the button “‹ Back to the list”, under it the fields of the object (prefab, position, turn, size) and “Delete object (Del)”. The block stands in view without scrolling. “Back to the list” drops the selection and shows the list again; the Esc key on the map does the same.
- The model for new objects (1) stands in the row “Model”. With “change in the catalogue” you open the catalogue at the chosen group (otherwise at “All”) and pick another model; the question mark at the top of the foot explains the keys.
- Below it (3) you set the turn of new objects. With “Random” on, every object stands differently; otherwise the angle you enter is used.
- The height follows the ground automatically. While no object is chosen, the list “On the map” stands under the unfolded group and shows how many objects of this group stand on each island: a click unfolds the models of the island, the eye centres the map, the cross removes a whole bundle (Ctrl+Z brings it back).
Tip: After placing, the status line at the bottom says “… placed — Ctrl+Z undoes it”. That also works for several objects in a row. Where are the drawing tools? You draw islands, rivers and lakes under Terrain and Water; Objects only has placing.
Uploading your own 3D model
What for?
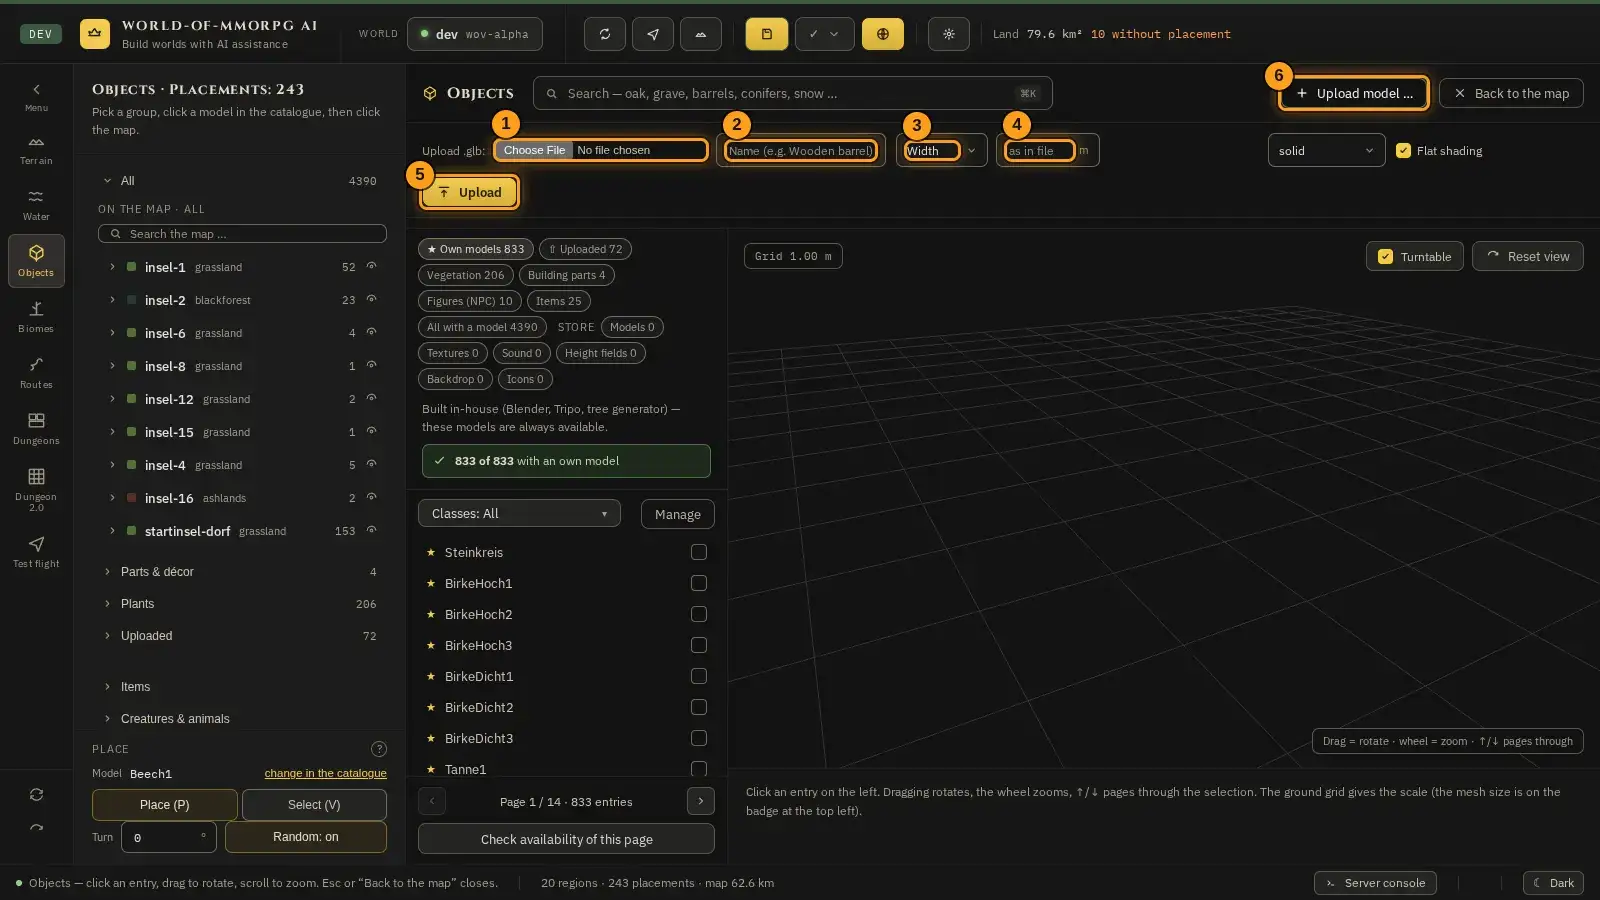
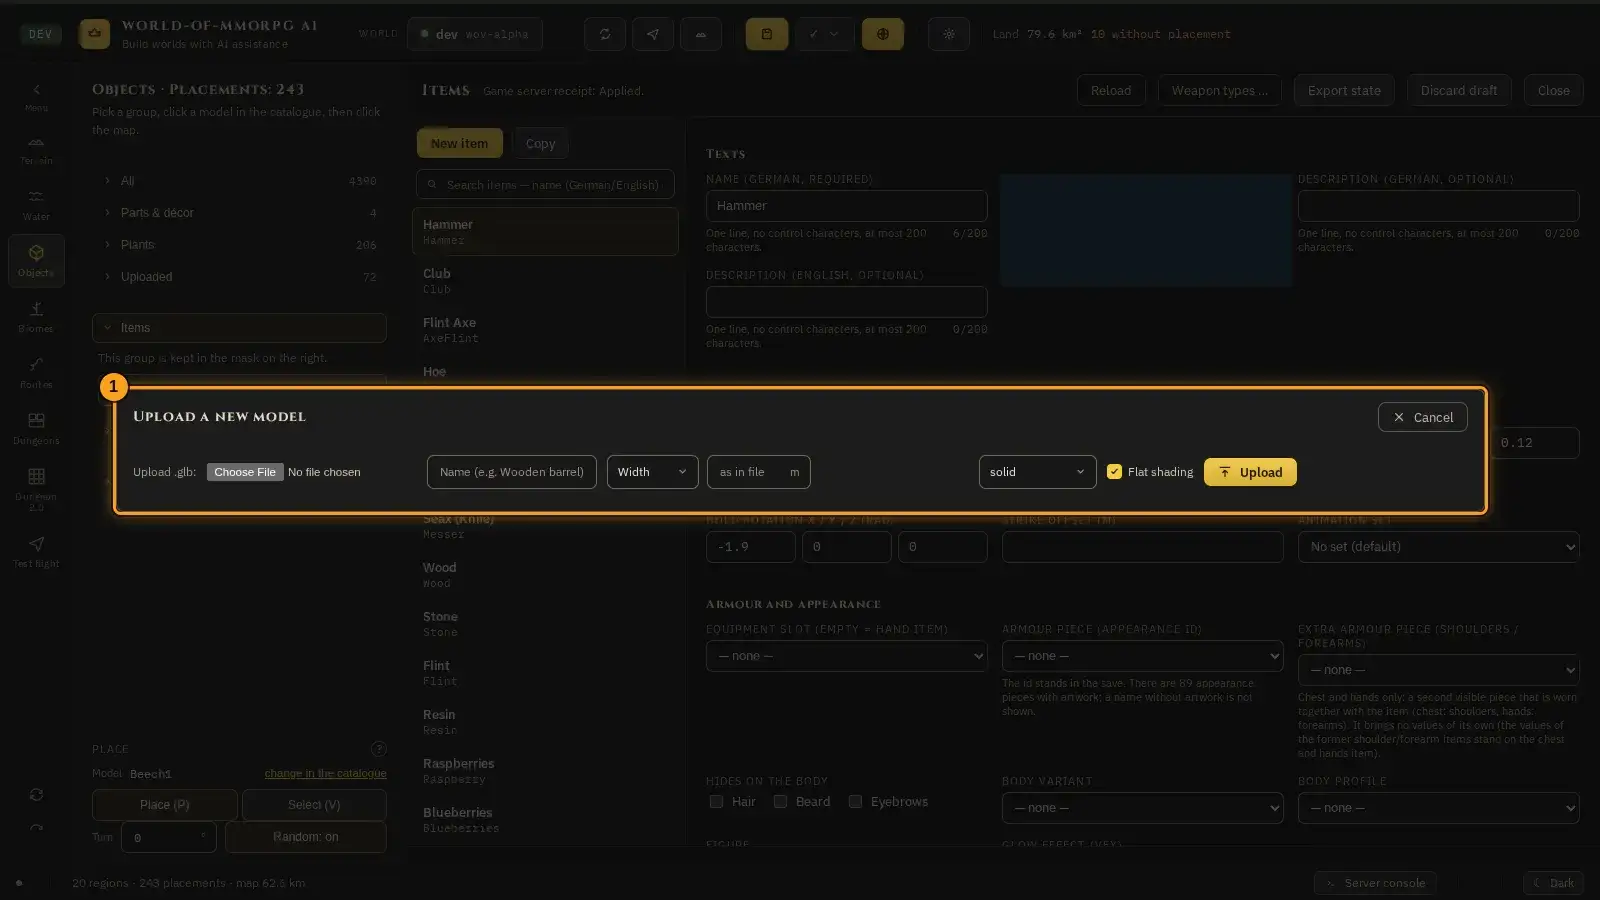
If a model is missing from the catalogue, you build it yourself, for example in Blender, and upload it right in the editor. At the top right of the catalogue stands the button “Upload model …”; it unfolds the line “Upload .glb:” with the button “Upload”, otherwise the line stays folded. The same building block stands in the item mask and in the creature mask; there the button “Upload a new model …” opens it as a dialogue. Afterwards the model is listed in the catalogue under “Uploaded”.
How it works
- Open the catalogue (mode Objects, one of the catalogue groups) and click “Upload model …” at the top right. Under the header the line “Upload .glb:” with the button “Upload” unfolds; a second click on the button folds it again. In the item or creature mask you click “Upload a new model …” instead; the dialogue “Upload a new model” then opens over the surface, and “Cancel” closes it again. In the animation care of the creature mask a button carries the same name but opens no dialogue: it only switches to Objects.
- At (1), choose your .glb file on your computer.
- At (2), enter a name, for example “Wooden barrel”. You will find the model in the catalogue under this name.
- At (3) and (4) you set the target size: choose which edge the figure refers to and enter the size in metres. If the field stays empty, the size from the file is used. The dialogue also suggests a value for you.
- Further down stand three settings: whether the model is “solid” or “passable” (solid blocks players), the tick “Flat shading” and the “Base scale”. Then click “Upload” (5). After a short while the model appears in the list.
Tip: Only upload models you built yourself or are allowed to use. The target size keeps a barrel from turning out as big as a house. If something goes wrong during the upload, the dialogue stays open and offers “Try again”; if the object class is missing, you can still keep the model with “Take it without the class” and add the class later in the catalogue.
Sorting objects into classes
What for?
Classes such as “Houses”, “Fences” or “Decoration” keep the catalogue tidy. You can create your own classes and assign objects to them.
How it works
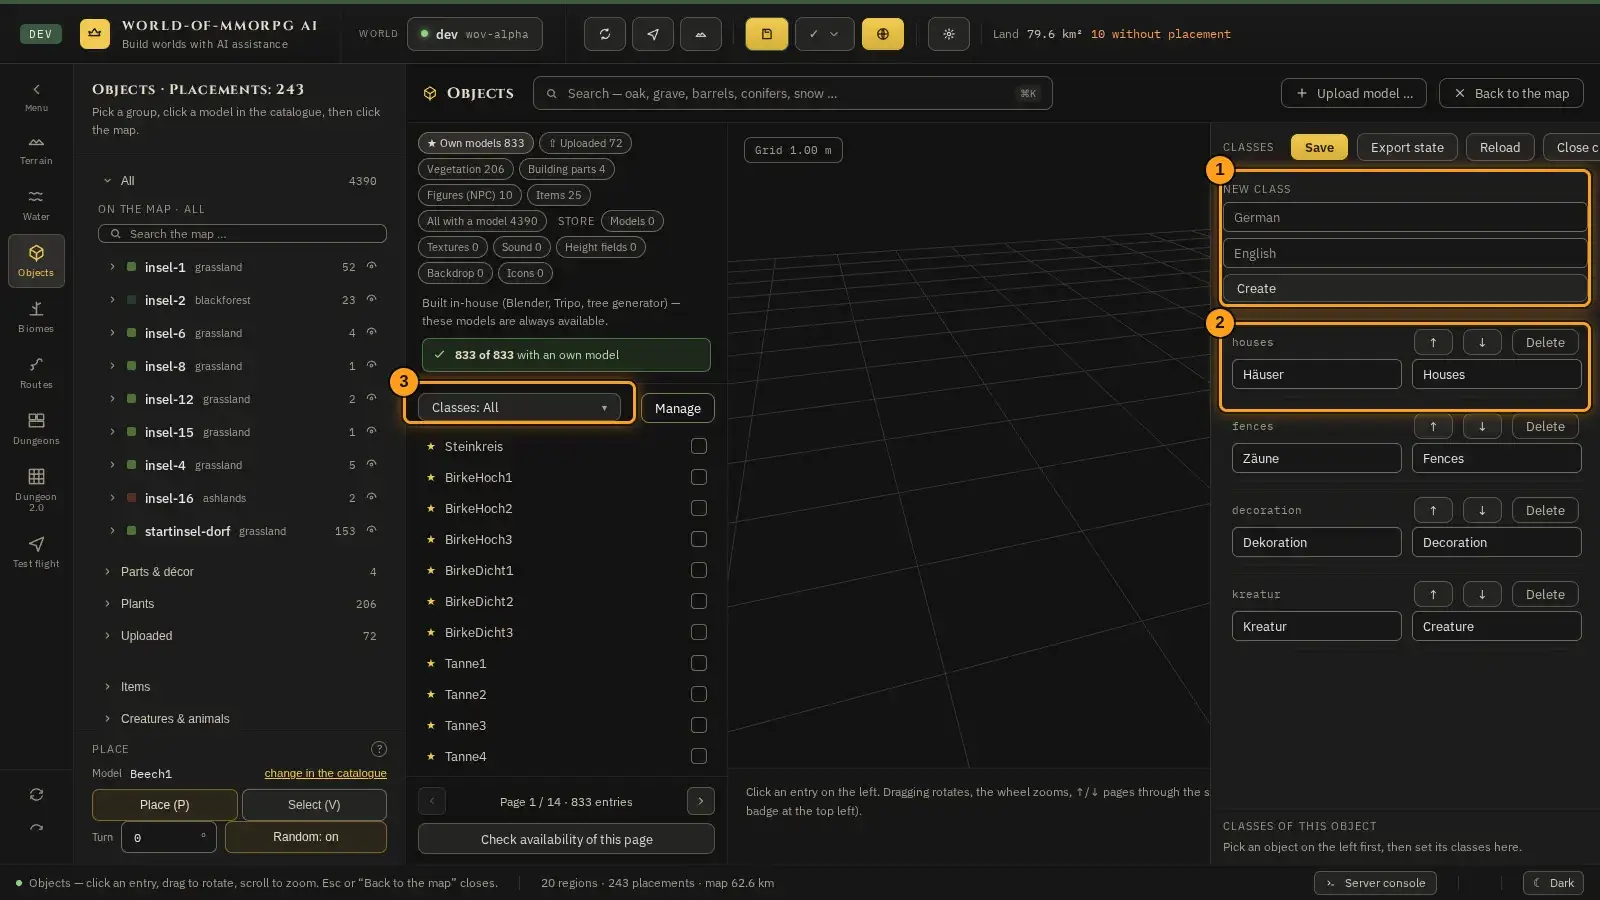
- Open the catalogue and click “Manage” on the left above the list, next to the filter “Classes: All”. The class manager opens on the right.
- Under “New class” (1) you enter the German and the English name and click “Create”.
- In the list (2) you change the names, move a class up or down with the arrows or click “Delete”.
- Pick an object on the left. At the bottom right, “Classes of this object” lets you decide which classes it belongs to.
- Click “Save” at the top of the class manager. Afterwards the class filter (3) shows your new order. Unsaved changes are never lost silently, neither on “Reload” nor on saving. If you changed something and the server holds the same state, your draft stays (“Reloaded: the server holds the same state, your draft stays.”). If somebody else saved meanwhile — whether you press “Reload” or the server refuses “Save” (then it says “Somebody else saved first — your draft stays …”) — your draft stays, and a block under the header names the difference (“Only in the draft”, “Only on the server”, “Named differently” (with the name the server holds), “Assignment differs for”, “The order of the classes differs.”). “Save” is locked until you choose: “Keep draft (overwrites the server state)” makes the new server state the base, so your save overwrites the server’s version; only with this button are classes and assignments lost that exist only on the server (the block says so beforehand; the other two ways lose nothing on the server); “Take server state” loads the server state and drops the draft; “Keep both changes (merge)” puts your changes on top of the server state: classes and assignments that only one side changed are both kept, so are identical changes of both sides, and the order of the side that rearranged. The result is not saved yet, the mask says “Merged – not saved yet. Please check and save.”; you check it and click “Save”. If both sides changed the same thing differently (two names for one class, two assignments for one object, different orders) or one side deletes a class the other still assigns, the block says “Cannot merge …” with the places concerned instead (for different orders the word “order”, for a deleted class the sentence “object … is assigned to class …, which the other side deleted”), and the button is missing. That line gives the reason in words, for example that the object name is invalid, too long or reserved; the mask never shows the codes of the check. If you changed nothing, “Reload” takes the server state without asking. If the operations service answers while loading but the class document cannot be read, the header says “Document unreadable” (instead of a refusal with a status number); the state in the mask and your draft stay unchanged. “Close classes” closes the panel again.
- With “Export state” you download the state of the classes as a file. Beforehand the editor compares it with the starting stock in the repository, the state that ships with the game. If your state has lost keys — also inside an entry — it asks: “The working copy has … keys fewer than the starting stock in the repository, e.g. … Export anyway?” A yes accepts the loss on purpose; with a no it says “No export: the loss against the starting stock was not confirmed.” If the comparison could not be made (completely), it asks in the version “It could not be (fully) determined whether the working copy loses keys of the starting stock in the repository. Export anyway?” If the state changes between the check and the download, the editor says “No export: the state changed between the check and the download.” — then export again.
Tip: Give every class a name in both languages. That way every player and fellow builder sees the same order in their own language.
Creating items
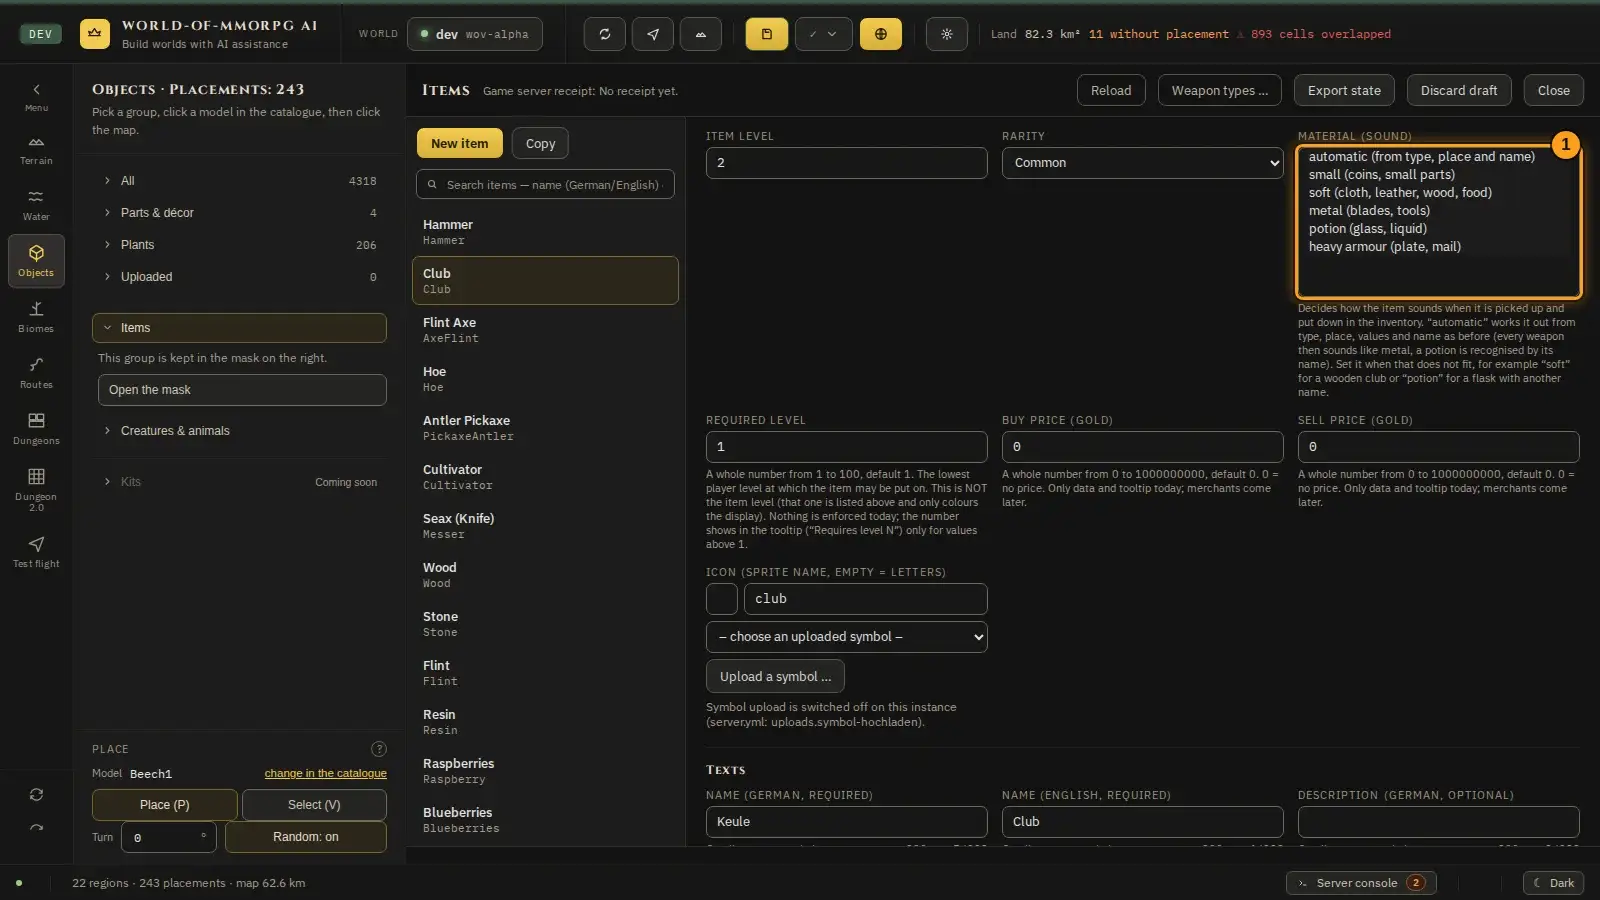
What for?
An item is something players can carry, use or process: a hammer, an axe, a piece of wood. Here you can, for example, turn an uploaded model into a playable item.
How it works
- Choose “Objects” on the left, then the group “Items”. The mask opens over the map. There you set the values.
- On the left (2) is the list of all items with a search field. “New item” (1) creates a new one, “Copy” makes a template from an existing one. The list can also be operated with the keyboard; the keys are described in the last step (With the keyboard).
- In the “General” section (3) you set the id. It starts with a capital letter, uses letters and digits only, has up to 32 characters and is fixed once the item is saved for the first time. Then come type, weapon type, stack size, weight, item level, rarity, “Required level”, “Buy price”, “Sell price” and symbol. “Required level” (a whole number from 1 to 100, default 1) is the lowest player level at which the item may be put on; it is separate from the item level, which only concerns the display and rarity of the piece. Nothing is enforced today, because there is no level system yet; the number shows in the tooltip as “Requires level N” only when N is above 1. Once the level system arrives, the rule is meant to be: if the player level is lower than the required level, putting the item on is refused. “Buy price” and “Sell price” are gold, whole numbers from 0 to 1,000,000,000, default 0; 0 means “no price” (not tradable). Today they are only data and tooltip lines (lines of the form Buy price N gold and Sell price N gold, only for values above 0); merchants come later. All three fields accept digits only (no fraction, no exponent, no sign), and the mask reports a violation at the field. The choices in the weapon-type field come from this world’s weapon types (a newly created world starts with ten: fishing rod, axe, bow, club, shield, sword, spear, pickaxe, staff and mace); the “Weapon types …” button in the mask’s header opens their management. “— none —” means: no weapon type. The value stays when you change the type, so nothing is lost silently. “Shield” can be picked; for an item that is a one- or two-handed weapon the save refuses it and the mask reports it at the weapon-type field.
- The field “Material (sound)” in “General” (1) decides how the item sounds when it is picked up and put down in the inventory. The choices are “automatic (from type, place and name)”, “small (coins, small parts)”, “soft (cloth, leather, wood, food)”, “metal (blades, tools)”, “potion (glass, liquid)” and “heavy armour (plate, mail)”. With “automatic” (the default, the field is empty) the game works the group out from type, place, values and name: every weapon and tool sounds like metal, food and light armour sound soft, heavy armour dull, an item whose name says potion, elixir, flask, vial, Trank, Flasche or Phiole (also in the plural and spelled with ae instead of ä) sounds like glass, everything else small. When that does not fit, for example for a wooden club, you choose the sound yourself: a chosen value always wins over the derivation. The field changes only the sound, no values. It is saved and reloaded like every other field; if you and another editor changed it at the same time, the difference view of the conflict shows both values under “Material (sound)”, with the names of the choice (“automatic (from type, place and name)” instead of “empty”). If a file holds a sound this editor does not know (for example from a later version), the choice shows it as “unknown: …” and keeps it selected; it is saved only once you pick one of the six choices, so it is never lost unnoticed. This holds for the whole file: if another entry has such a sound, saving your entry is refused as well. The list marks such entries with “Material unknown”, the opened entry shows the message at the field “Material (sound)”, and the refusal names the entry and the field; open it, choose “automatic” or one of the five sound groups, and save.
- Under “Texts” you enter name and description. The name is required in German and English, the description is optional.
- Under “Model and hand” you choose the uploaded model and set how the item sits in the hand: hold position, hold rotation, scale, strike offset and animation set. The animation set has five choices: sword, staff, spear, bow and fishing rod; until they get animations of their own, the bow and the fishing rod show the same pose as the staff. If you pick a weapon type, an animation set that is still empty takes over that type’s hold set. If you change the type, an inherited hold set follows the new type (or becomes empty when the new type has none); a set you chose yourself stays and applies. A set that exactly matches the type’s hold set counts as taken over after saving and reopening, and then follows the type again.
- Further down are the values (damage, armor, strength, vitality, agility), harvesting, the effect when eaten, durability and the recipe. The effect when eaten (bonus to maximum life and duration in seconds) appears in the game as a buff in the character field. Independent of it is the “Instant healing” section with the field “Health points that come back at once (key F)”: a whole number from 1 to 100000. If the field stays empty, the item does not heal at once. When a player uses the item with key F, exactly that many health points come back in one go, up to the maximum health at most, and one piece is used up; the item’s tooltip in the game then says that it heals at once, with your number (at 15: instantly restores 15 health). The difference from the eating effect: the eating effect raises the maximum health for a duration (a buff); the instant healing only refills the current health. An item may carry both; then both apply, and the instant healing replaces the fixed healing of 10 that every meal brings otherwise. An item with instant healing only (a healing potion, say) is not used up at full health; you see the note “Your health is already full”. Dead players cannot use anything. Key F eats the best food in the bag first; only when there is none does it use the item with the largest instant healing. “Save” takes everything over.
- Under “Armour and appearance” you pick the equipment slot (1). There are seven places: Head, Chest, Legs, Boots, Hands, Main weapon and Second weapon. The armour piece (2) is the appearance id that belongs to one of those places; without a place the item stays a hand item. A chest item can carry a shoulder piece as well, and a hands item a forearm piece: that is what the field “Extra armour piece” (3) is for. It offers only shoulder and forearm pieces, brings no values of its own, and is worn and shown only together with its item. The values of the former shoulder and forearm items now stand on the chest and the hands item of the same set (added up), so whoever wears a whole set has the same values as before. The places Shoulders, Forearms, Necklace, Bracelet and Rings no longer exist: an item that still sits in one of them is kept but can no longer be worn, and the mask shows the note “This slot is gone: no longer wearable …”. Pick one of the seven places to make it wearable again.
- The “Ranged combat” section appears only for weapons (one- and two-handed) and for materials. On a weapon you tick “Ranged weapon” and choose the ammunition; the choice lists the entries that are marked as ammunition. Five numbers for the shot follow: draw time in seconds (default 1, allowed 0.1 to 30), projectile speed in m/s (default 40, 1 to 200), drop in m/s² (default 7, 0 to 50), range in metres (default 80, 1 to 300) and spread in radians (default 0.01, 0 to 1). An empty field takes the default; if a number is outside its range, the mask reports it at the field. On a material you tick “Is ammunition”; only such entries can be chosen as the ammunition of a ranged weapon. A ranged weapon is saved only if its ammunition is an entry with that flag; otherwise the mask says “Choose the ammunition of the ranged weapon.” or “The chosen ammunition is not an entry with the flag “Is ammunition”.” If you change the type, what you typed stays in the form; it is saved only while the type fits (ranged combat only on weapons, “Is ammunition” only on materials). A ranged weapon does not strike in melee: a left click with it in the hand triggers no swing, costs no stamina and harvests nothing. The shot itself (drawing, releasing, the arrow’s flight) follows in a later step; until then the fields only set the data. The Hunting Bow (45 coins), the War Bow (80 coins) and arrows (2 coins) are in the item catalog; a world builder can offer them at a merchant or hand them out. Arrows are ammunition.
- The “Fishing” section appears only for weapons (one- and two-handed) and for materials. On a weapon you tick “Fishing rod”; five numbers follow: shortest cast in metres (default 4, allowed 1 to 20), longest cast in metres (default 14, 2 to 40), wait factor (default 1, 0.1 to 5; lower means a shorter wait), bite window in seconds (default 1.5, 0.5 to 10) and wear per catch (a whole number, default 0, 0 to 10; prepared, without effect in this version). An empty field takes the default. The shortest cast must not be longer than the longest; otherwise the mask reports “The shortest cast must not be longer than the longest.” at the field. A weapon cannot be a fishing rod and a ranged weapon at the same time; if you tick both, the mask says so and does not save. The “Fishing rod” tick and the weapon type “Fishing rod” belong together: the tick requires the weapon type “Fishing Rod” and the weapon type “Fishing Rod” requires the tick; otherwise the editor refuses to save with a message. On a material you tick “Is bait”: bait improves the catch chances but is not required; a material cannot be bait and ammunition at the same time. If you change the type, what you typed stays in the form; it is saved only while the type fits (fishing rod only on weapons, “Is bait” only on materials). A fishing rod does not strike in melee: a left click with it in the hand triggers no swing, costs no stamina and harvests nothing. Casting and catching follow in a later step; until then the fields only set the data. The starting stock holds the fishing rod (weapon type “Fishing Rod”, shown in the staff pose for now), four fish (small, medium, large and rare fish, edible) and flotsam; the entrails are marked as bait. The fishing rod is sold by no merchant: it enters the game only through the editor or the test flight.
- Biomes, creatures, animal animations and items keep unsaved input as a draft when closed, on Esc and when switching masks, without asking. Reopening shows the draft. A dot on the menu entry marks unsaved input; the Objects tile collects the item and creature dots. “Save all” also writes drafts from closed masks. Only “Discard” or “Discard draft” explicitly removes input. Drafts belong to this editor session: closing a mask is not saving, and you must save before leaving or reloading the browser page.
- With “Export state” you download the state of the items as a file. Beforehand the editor compares it with the starting stock in the repository, the state that ships with the game. If your state has lost keys — also inside an item — it asks: “The working copy has … keys fewer than the starting stock in the repository, e.g. … Export anyway?” A yes accepts the loss on purpose; with a no it says “No export: the loss against the starting stock was not confirmed.” If the comparison could not be made (completely), it asks in the version “It could not be (fully) determined whether the working copy loses keys of the starting stock in the repository. Export anyway?”
- The “Weapon types …” button in the mask’s header manages this world’s weapon types: the list on the left, the form on the right with id, German and English name and hold set. “New” adds a type; its id stays fixed afterwards, even when you change the names. A type that an item carries cannot be removed — change the item first; “Remove” asks with a second click. What you save in that window is available in the weapon-type field right away. A type’s hold set is the suggestion for its items — it changes no item by itself. If someone else saved the weapon types while you were working, the operations service refuses your save (“The state changed since it was loaded”). The window loads the new state under your input. The banner reads “The state changed since it was loaded — nothing was saved.”, “Save” is locked, until you choose (you do not see “Remove” in this dialog, because it only shows while the form is unchanged): “Load the server state” drops your input, “Keep my input” puts only the fields you changed yourself onto the new state. Either way the lock ends; only after “Keep my input” does the banner show the lines “Taken from the server: …” and “Also changed by the other session: …” (the colliding fields). A type that was deleted meanwhile is only added again when you press the button — closing and opening the window again does not change that: closing keeps the draft without asking, including when the item mask closes. The lock for a deleted type stays in force; only “Create it again” permits recreating it. “Save all” also writes the weapon-type draft before the item draft. “Discard draft” in the weapon-type window removes its input after one confirmation. The same button in the item mask discards both the item and weapon-type drafts together after exactly one confirmation; “Cancel” keeps both. The “Reload” button is in the banner in every state, also when everything is fine; it is missing while a dialog about an outdated state is open (its own two ways apply there), while a deleted type waits for “Create it again”, and while a save or removal is running, and while the window is loading (status line “Loading weapon types …”). It fetches the current server state and never discards your input. If the reload fails, the window reports the load error, your draft stays and “Reload” stays there as the way out. If the operations service confirms a write without a state hash and the immediate reload fails, the status line reads “Written, but reloading failed” (also after a click on “Reload” or “Remove” whose load fails again) and the banner shows the “Reload” button: it fetches the server state and does not discard your input. If you entered nothing, the form takes over the server state silently: no dialog appears, nothing is locked, and the status line names the loaded state; if the state really differs from what was on screen, the banner also reads “The server state was taken over.”, otherwise the banner stays empty; an empty “New” form stays as it is (only for “Reload”; when you open the window again, the first entry is selected). If you entered something and the state differs from yours, the same two ways “Load the server state” and “Keep my input” appear, but with a different banner: “The server state has moved on — check the difference before you save again.” “Remove” is missing in this dialog, because your form is changed. If the document cannot be read after “Reload”, the reasons stay in the banner, even when you entered something; “Reload” stays there as the way out until the document reads again. “Remove” asks on the first click (the status line and the button change to “Remove for good?”); after the second click on “Remove for good?” a browser confirmation dialog follows (“The weapon type … will be removed for good …”), and only confirming it removes the type — cancelling removes nothing; while a dialog about an outdated state is open, “Remove” removes nothing — load first, then remove.
- If an item carries a weapon type this world does not know — because the type list was changed, or because the state came from another source —, the editor accepts the item, but the operations service refuses to save it. The mask then reports “Unknown weapon type” and names every affected item with its id and type; the “Weapon types …” button in that dialog opens the management where you add the type. Then save again. If an item carries a type its world no longer knows, the value stays in the weapon-type field — as its own entry with the note “The weapon type … is not among this world’s weapon types” —, and you either pick another type there or add the missing one. If the operations service refuses a save because an existing item breaks the write rule (for example a shield on a weapon), that item stands in the banner above the form with its id and reason, and every save of the file is locked until it is fixed.
- With the keyboard: Tab moves into the list of items; the whole list is a single tab stop, and another Tab leaves it. The Up and Down arrow keys move the focus from row to row without wrapping around at the ends; Home and End jump to the first and the last row. The arrows open nothing: only Enter, Enter on the numeric keypad or the Space bar opens the row that has the focus, and with unsaved input the mask asks first, just as it does for a mouse click. If you hold the key down it opens only once; the arrows, however, may repeat. After opening, the focus stays on that row. If the row with the focus disappears from the list, the focus moves to the row that now stands in its place; if no row is left (the search finds nothing or the state is empty), it moves into the search field. Key combinations with Ctrl, Alt or Meta (for example Alt+Left arrow for “Back”) are not caught by the list; they belong to the browser. All other keys belong to the mask while it is open: on the list, on a button or tab, on the free area of the mask, and even when no element has the focus. Delete, Backspace, P, V or T trigger no editor shortcuts there, and the object selected on the map behind the mask is left alone. Esc closes the mask, and Tab moves the focus as usual. In the search field you type as usual; a space does not open anything there either. For assistive software such as screen readers, the list is marked up as a selection list and the opened item as selected; messages such as “Saved” in the footer of the mask are marked up as a polite announcement. How a particular program reads them out is up to that program.
- An item’s symbol (field “Symbol” in “General”) is the name of an image. Next to the field you pick an already uploaded symbol from the list (with its name in your language and the identifier in brackets); a small picture shows the chosen symbol. “Upload a symbol …” opens the upload panel: you choose a PNG file and see a preview at once, then you type the display name in German and in English (both are required, at most 64 characters each, no slash, backslash, “..” or control characters). Only PNG is accepted (RGB, RGBA or palette, 8 bit, not animated, not interlaced), at most 512 KB and 16 to 1024 pixels per side; the mask checks this before uploading and names the number when it fails, the operations service checks it again and decides. The operations service derives the identifier (u_ and twelve hex digits) from the image content, never from the name: the same image twice gives the same symbol and the first name stays. After the upload the symbol is chosen on the item (it is applied only with Save, like any change) and is available to all items of this instance. “Remove this symbol” deletes an uploaded symbol only when no item uses it; otherwise the mask names the items that still use it. “Upload a symbol …” does not work when the switch “symbol-hochladen” in the “uploads” section of the server configuration is off (the default), on the live instance (always blocked there) or without being signed in to the operations service (error 401); the mask names the reason. The operations service allows at most 30 uploads per minute; on “Too many uploads” wait the seconds it names.
Tip: Create a new item with “Kopieren” if it is similar to an existing one. Then you only have to change a few values.
Merchants: price lists in the editor
What for?
Merchants sell wares from a price list, and every world has its own lists. Here you create and edit the price lists. Which figure gets which list is set on the figure in the test flight.
How it works
- Open: Choose “Objects” on the left and then the group “Merchants”. The window “Merchant price lists” opens over the map. On the left are the merchants of your world with name, id and number of wares, on the right the wares of the chosen list. A list marked “Finding” has a message on the right, one marked “changed” has unsaved changes.
- New list: Click “New merchant”, enter the id (lowercase letters, digits, _ and -, 1 to 40 characters) and the name in German and in English, then “Create”. The id is fixed afterwards because figures point at it; only the two names can be changed later. A world has up to 200 lists. Switching the editor language only changes the display, not the stored names.
- Choose a ware: Select the list and click “Add ware”. Type part of the name or the id into the search field; the items of your world are offered, and an item that is already in the list is greyed out. A click adds the ware with a stock of 10 and no refilling. A list has at most 60 wares.
- Suggestion: The prices start with the suggestion from the item: the buy price is its buy value, the sell-back price its sell value, both are in the item mask. If you changed the numbers, “Use suggestion” in the row sets both back to these values.
- Prices and range: The buy price is what the player pays, the sell-back price is what the merchant pays the player for one piece; both lie between 0 and 1 000 000 coins. For every ware: sell-back price at most the item’s sell value, sell value at most the buy price. So nobody can gain coins by buying and selling right away. At a sell value of 0 no merchant buys the item back; set it in the item form. If you type a number that breaks this, it stays in the field and the line below the row says “Saved as …”: that is the value the service really writes.
- Zero means something: A buy price of 0 means the ware is not for sale. A sell-back price of 0 means the merchant buys the ware at the item’s sell value. This also holds for items that are not on the list: every merchant buys every item that has a sell value, and the list goes first. The stock is the largest amount the merchant holds at once, from 0 to 9999; with a stock of 0 the merchant only buys the ware and does not sell it.
- Refill time: You give it as a number with a unit (seconds, minutes, hours or days); the window stores it in seconds. 0 means the stock never refills. Otherwise it is at least 5 seconds and at most 30 days; a number outside is reported at the row and not saved.
- Sold goods disappear: What a player sells to the merchant is bought and not sold on. It does not return to the stock. Coins are not a ware: in the search they are greyed out (with the hint). If a coin row is already in a stored file, the window names it as a loss when loading and asks before saving; it is never written as a ware.
- Order and remove: “Up” and “Down” reorder the wares of a list, “Remove” takes a ware out of the list.
- Item unknown: If an item of the list does not exist in your world (deleted, renamed or never created), the row is marked and says: “Item unknown – create it in the item mask or remove the ware.” Its prices stay unchanged and are not checked until the item exists again. An item that is in a price list cannot be deleted in the item mask.
- Saving: “Save” at the top of the window writes all changes to the price lists; next to the button it says how many lists are unsaved. Saving in the editor’s header writes them too: the change list then has the row “Merchants”. Without a change nothing is written.
- Question on loss: If saving would drop, change or remove something (a whole list, an unknown field, a price the service straightens out), the window asks first and names every loss one by one. The question “Save anyway?” is the browser’s own question: only “OK” writes; with “Cancel” everything stays as it was and the state stays “changed”. If someone changed the price lists elsewhere in the meantime, the window reports a conflict: your draft stays, and “Reload” fetches the service’s state but discards your draft.
- Size: At the bottom of the window is the size of the document in bytes out of 4 MiB (4 194 304 bytes). From 90 percent the line is highlighted; the service does not store a larger document.
- Delete a list: “Delete list” asks for the id and deletes the list in the service at once. If a figure still points at the list, the service refuses and the window names the figures; set another list on them first. The same holds for a save that would remove the list. The guard only protects the saved layout: a figure that points at the list only in the world’s unsaved draft does not protect it.
Tip: Create a new list with a few wares and take the suggestion for each ware first. Change the prices only after you have seen in the test flight how the trade feels. A merchant is always friendly and can be talked to, even if its model belongs to a hostile people (for example the Furloc shaman): it never attacks.
If something does not work
- A price looks different after saving than what I typed.
- The price broke the range: sell-back price at most the sell value, sell value at most the buy price. The row showed this beforehand with “Saved as …”. Change the price in the list, or the buy value or sell value in the item mask.
- The window says “Item unknown”.
- The world no longer knows the item. Create it again in the item mask with the same id, or remove the ware from the list. Until then its prices stay as they were.
- Saving or deleting says figures point at the list.
- A figure carries this price list. The window names the figures; in the test flight choose another list or “none” in the field “Price list” on each of them, save the world and try again.
Place markers: named places for quests
What for?
A place marker is a named, invisible point with a radius. A quest goal of the type place points to the marker (to its id), not to coordinates: if you move the marker, the goal follows.
How it works
- In the test flight open the spawn panel (key B) and find the block “Place marker” below the list.
- Enter the name in German and in English (at most 40 characters per language) and the radius in whole metres (1 to 500, default 10).
- Click “Place a marker” and then into the world: the marker stands there and is shown as a circle with its name.
- Grab the marker like any placement to move it; Delete removes it.
- Only the editor and the test flight show the circle and the name. In the game the marker is invisible and creates no object.
- If a quest goal uses the marker, deleting is refused and names the quests and goals. Confirm with Shift+Delete; the quest goal then stays without a marker.
- A world holds at most 200 place markers; further ones are dropped with a notice. The radius in the quest goal counts for the quest; the radius of the marker is the default and the circle in the editor.
Tip: You can rename or move a marker at any time: quests point to the id and do not need to change for that.
If something does not work
- Deleting a place marker is refused.
- At least one quest goal points to it. The message names the quest and the goal; change the goal or confirm the delete with Shift+Delete.
- I do not see the place marker in the game.
- That is intended: place markers are invisible in the game. Only the editor and the test flight show the circle and the name.
Quests: missions in the editor
In developmentWhat for?
Quests are missions that a figure gives: with goals, a conversation and a reward. They are data in your world, in German and in English, and need no code. Here you create and edit quests. The “Quests” window is built; its entry in the “Objects” menu comes in a step of its own, so until then it cannot be opened in the editor yet. How a quest runs in the game (accepting, counting, completing) comes later as well.
How it works
- List: On the left are the quests of your world, grouped by the figure that gives them (a figure with the role “Quest giver”). Each group shows the number of its quests; from 8 quests of one figure the window warns “The choice will span several pages”, because the choice in the conversation then runs over several pages. The order of a figure’s quests is the order of that choice; you change it with the arrows. A quest whose figure is no longer in the world stays visible and says “Figure missing”. A world has up to 120 quests.
- New quest: Click “New quest”, enter the name in German and in English and choose the template. “Simple quest” brings a finished conversation with 5 nodes (offer, accepted, running, done, thanks), “Empty quest” starts empty. The window suggests the id (lower-case letters, digits, _ and -, 1 to 40 characters) from the name; after creating it is fixed, because prerequisites and conditions point to it. “Duplicate” copies a quest together with its conversation.
- Head of a quest: name (at most 48 characters) and description (at most 400 characters) in German and in English; the giver, that is the figure that gives the quest; the prerequisite, another quest that has to be completed first (itself or a circle is not possible); and the check box “Repeatable”.
- Goals: A quest has up to 8 goals, whose order you change with the arrows. Each goal has a display text (at most 120 characters) in German and in English. There are seven types. Kill creatures: creature deaths are counted (count 1 to 9999). Talk to a figure: counts as soon as the conversation with the figure is opened. Deliver items: the items are removed from the backpack when the quest is completed, at the giver only if you wish. Collect items: the stock in the backpack counts, nothing is removed. Reach a place: counts on entering the radius (1 to 500 metres) of a place mark. Use an object: counts when the chosen placement is used. Defeat a boss: counts on defeating the chosen boss. You choose creatures and items from the catalogues of your world, figures and objects from the placed placements.
- Place mark: For “Reach a place” you choose a place mark from the list. Its radius is filled in when you choose it; afterwards the goal’s own radius counts, and you can change it. You set place marks in the test flight; as long as there are none, the window says “No place mark available – set one in the test flight”. A mark that does not exist is reported as a missing place mark.
- Conversation: In the conversation only the figure speaks, the player chooses answers. A conversation has up to 10 nodes, a node up to 6 answers. Each node has a text (at most 400 characters), each answer a text (at most 120 characters), each in German and in English. An answer can have a condition (quest open, running, done or handed in, or “Player has item”), an action (accept, complete, abandon the quest, or end the talk) and a node it continues at. The conversation may run in a circle. The tree view does not unfold a circle endlessly: it shows “↺ back to …” and stops after 12 levels. A node no way leads to is reported as “cannot be reached”.
- Start per state: “Start (quest open)” is the node the conversation begins with. For the states accepted (active), all goals met (done) and completed (handed in) you choose an own start node each; without an own start the start of the open quest applies. So after accepting, the figure says something else than before.
- “abgeben” twice: In the document two things are called “abgeben”. The answer action is called “Complete quest” in the window and collects the reward; the goal “Deliver items” removes items. A quest with goals needs at least one answer with “Complete quest”, otherwise the window reports “The quest cannot be completed”.
- Reward: up to 8 items with a count (1 to 9999) and coins from 0 to 1,000,000. Coins are the item “Coins”.
- Checks: At the bottom of the window are the checks of all quests, for example: quest without goal, incomplete goal, giver without figure, prerequisite unknown, on itself or in a circle, start missing, answer without a way on, node that cannot be reached, unknown creature or unknown item, missing place mark. “Go to” selects the spot. A finding never forbids saving.
- Saving and size: “Save” writes all changes of the quests; saving in the editor’s head bar writes them too (line “Quests”). If saving would change or remove something (an incomplete goal, a number outside its range, a text that is too long), the window asks first and names each case; with “Cancel” everything stays as it was. Texts are brought into normal form when saving (Unicode NFC, at most 30 characters in a row). At the bottom is the size of the document in bytes of 8 MiB (8,388,608 bytes). From 80 percent of a limit (96 quests, 8 nodes of one quest, the size of the document) the window warns; the largest allowed document is about 7.3 MiB, texts with many umlauts need more room.
Tip: Start with the template “Simple quest”: give the quest a goal, choose the giver and change the texts. The tree view shows you whether every node can be reached and where the answers lead.
If something does not work
- The window reports “The quest cannot be completed”.
- No answer of the quest has the action “Complete quest”. Choose it on the answer with which the player collects the reward in the state “done” (in the template this is the node “fertig”).
- Saving asks “Save anyway?”.
- The window names each case: an incomplete goal (creature, item, figure or place missing), a number outside its range or a text that is too long would be removed or cut when saving. Cancel, correct the spot (with “Go to”) and save again.
- Deleting a quest names other quests.
- Other quests point to it, as a prerequisite or in the condition of an answer. The window names them before deleting. If you delete anyway, their references point nowhere and are reported as unknown.
- A quest shows “Figure missing”.
- The figure that gives the quest is no longer in the world (deleted or not placed yet). Choose another giver in the head of the quest or place the figure again in the test flight.
Recipe: profession, skill, station
In developmentWhat for?
The recipe of an item can belong to a profession. Then, besides the ingredients, the skill in the profession counts, and the recipe gets a place (station), a duration and a source, that is, a way to learn it. All of it sits in the “Recipe” section of the item mask. It is not wired into the game yet: a recipe with a profession cannot be made yet, and the window on key C still shows only hand recipes.
How it works
- Create the recipe: tick the box in the “Recipe” section and enter the amount one craft yields and the ingredients. That is how it always was; the following fields appear below.
- Profession: pick one under “Profession of the recipe”. The choice “Hand recipe (no profession)” leaves everything as it was: the other profession fields then do not apply and are not saved. For now the list of professions comes from the starting document of the professions (Herb Lore, Brewing, Cooking), not from your world; the note under the field says so.
- Three thresholds: threshold 1 is the skill from which the recipe is usable (red below it), threshold 2 the skill from which it is yellow (orange below), threshold 3 the skill from which it is grey and the skill no longer rises. It must hold: 1 ≤ threshold 1 ≤ threshold 2 < threshold 3, all three whole numbers. The format allows threshold 3 up to 1100; if it lies more than 100 points beyond the skill scale of the professions document (standard: scale 1 to 300, so 400), the mask shows a note.
- Colour ranges: once the three thresholds are valid, the mask shows the ranges below them: red up to threshold 1 minus 1, then orange, yellow, green and grey. The border between yellow and green lies halfway between threshold 2 and threshold 3.
- Station and duration: the station is the place where the recipe applies (fire, forge or workbench); empty means anywhere. The duration lies between 0 and 60 seconds with at most one decimal place; empty counts as 2 seconds.
- Source and learning cost: “Known from the start”, “Learned from a teacher” or “Learned from an item”. A learning cost in coins (0 to 1,000,000) exists only with a teacher; empty counts as 0.
- Notes and saving: the notes under the fields say that the profession or the station is missing in the professions document, that threshold 3 lies too far out, or that the sell value of the product is higher than the ingredients cost to buy together. They do not stop saving. A mistake in one of the fields (missing threshold, wrong order, duration out of range) does.
Tip: Keep the thresholds in an even rhythm: yellow about 25 points after the start, grey another 25 (for example 1, 25, 50 or 50, 75, 100). That way a player can tell by the colour whether practising still pays off.
If something does not work
- Saving says “The profession fields of the recipe are incomplete or out of range”.
- The profession and all three thresholds belong together; the station must consist of lower-case letters, digits and single underscores (at most 24 characters), and a learning cost exists only with the source “Learned from a teacher”. Also check the spelling of the identifiers: the mask picks them from the list, a hand-written document can be wrong; then pick the profession and the station again from the list.
- I cannot find my recipe with a profession in the game.
- That is intended today: recipes with a profession do not appear in the window on key C, and an attempt to craft one the old way answers “You need a profession for that”. Crafting with a profession follows later.
- The mask says the sell value is higher than the ingredients.
- A product of a profession should not earn more at a merchant than its ingredients cost to buy (equal is allowed). Lower the sell value or raise the buy values of the ingredients. The note does not block saving.